Gluten-Free Pita That Feels Like a Win in Every Naperville Kitchen
There’s a special kind of triumph in watching a gluten-free pita bloom on a hot stone, especially when you’ve spent months tinkering with blends and methods between school runs, Riverwalk strolls, and weeknight dinners. In Naperville, where the weather swings from humid July afternoons to crisp January nights, gluten-free dough requires patience, intention, and a little local wisdom. I’ve refined this approach through countless batches baked in townhomes off 75th Street and older kitchens near Downtown, always chasing a pocket that’s soft, flexible, and sturdy enough for generous fillings. If you’ve ever stared at a package label and wondered whether a homemade version could taste better, the answer is yes—and it begins with selecting the right flours, harnessing hydration, and giving the dough the kind of heat that coaxes a pocket to life. Let your inspiration range wide; sometimes simply scanning a Mediterranean menu sparks ideas for the flavor pairings you’ll tuck into your next batch.
Gluten-free baking is less about replicating wheat exactly and more about building a structure that behaves similarly. Instead of elastic gluten strands, we rely on a cooperative network formed by starches, proteins, and binders. When that network is calibrated well, the dough traps steam rapidly and puffs into a pocket; when it isn’t, pitas can emerge flat or brittle. The principles are clear—balanced flour blend, ample hydration, controlled fermentation, and ferocious heat—and the fine-tuning comes from paying attention to texture and temperature as you mix, rest, and bake.
Choosing the Right Gluten-Free Blend
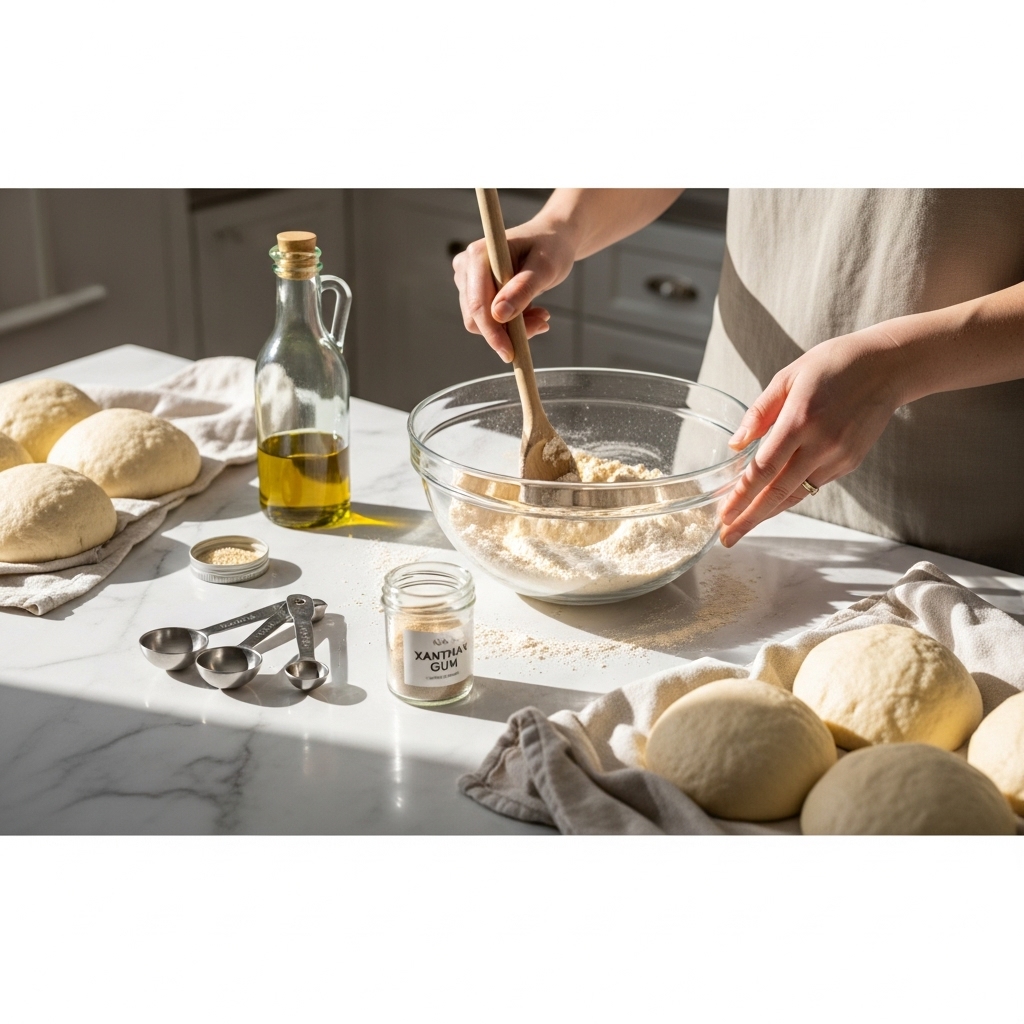
Start with a reliable all-purpose gluten-free flour blend that includes rice flour and starches like tapioca or potato. Look for blends that avoid strong flavors unless you want them, as bean flours can introduce earthiness that overshadows the delicate wheaten notes many of us expect from pita. For pocket formation, a little extra tapioca starch often helps with chew and stretch. If your blend doesn’t contain xanthan gum, add a modest amount; it bolsters elasticity and helps the dough hold gas. I also lean on finely milled sorghum or millet to supply tender crumb and a gentle, grain-forward flavor.
The beauty of Naperville’s grocery scene is the range of options. You can compare blends on the same shelf and choose based on label transparency and your taste preferences. Once you land on a favorite, stick with it while you hone your technique; switching brands changes absorption rates and can confuse troubleshooting. Store your flours in airtight containers in a cool pantry or fridge, especially in summer, when humidity nudges hydration out of balance.
Hydration, Binders, and the Role of Psyllium
Hydration is where gluten-free pita lives or dies. Gluten-free flours are thirsty; a dough that looks too wet by wheat standards is often just right here. Aim for a thick, scoopable batter-dough—soft enough to settle slightly, firm enough to be shaped with oiled hands after a rest. Psyllium husk powder is a game-changer: hydrated fully, it forms a gel that mimics gluten’s stretch. Whisk psyllium into warm water until it thickens, then mix with your dry ingredients and a little olive oil. Give the mixture ten minutes to hydrate before evaluating consistency. If the dough clings like paste, add a tablespoon or two of water; if it flows like batter, sprinkle in a bit more blend.
Xanthan gum complements psyllium by adding snap and cohesion. Used together in modest amounts, they create a tender but resilient structure that puffs reliably. Too much of either can make the dough gummy; too little, and it tears. Start small, take notes, and adjust in subsequent bakes. Remember that Naperville’s indoor air dries out quickly in winter; cover your bowl well and keep a damp towel nearby to rehydrate your hands and prevent sticking while shaping.
Yeast and Flavor Development
Yeast does double duty: it contributes flavor and pre-inflates the dough before the oven’s blast. Instant yeast is convenient, but active dry is fine if proofed. Add a teaspoon of honey or sugar to feed fermentation and encourage browning. Because gluten-free doughs can ferment unevenly, watch the visual cues rather than the clock. You’re aiming for a gentle puffiness and small bubbles across the surface, not a dramatic doubling. Over-proofing is common with gluten-free formulas and leads to fragile dough that collapses under heat.
For a deeper flavor, a brief cold rest—just a few hours—helps the starches hydrate and the aromas mingle. Resist overnight fermentation unless you’ve tested your blend’s tolerance; many gluten-free doughs over-oxygenate and weaken with long rests. If you do refrigerate, let the dough warm before shaping, as cold dough can crack when pressed.
Shaping for a Pocket
Gluten-free pita shaping is more like coaxing than like the assertive rolling you may use with wheat dough. Lightly oil your counter and hands, then portion the dough into equal pieces. Gently pat each piece into a ball and let it rest under a towel for ten minutes. This short bench rest relaxes the psyllium network and reduces sticking. Working with one piece at a time, flatten with your palm, then press outward from the center, turning as you go, until you reach a quarter-inch thickness. Keep edges a touch thicker. If you prefer using a rolling pin, dust it lightly with rice flour and use short, delicate strokes. Any cracks can be smoothed with damp fingers.
The surface matters: you want a top and bottom that are intact and uniform. Avoid deep dimpling or pressing fingerprints into the dough; these can weld layers and block a pocket from forming. If the dough sticks stubbornly, lift it with a bench scraper and dust the surface as needed, but err on the side of minimal flour to avoid drying out the exterior.
Heat Strategy: Ovens, Stones, and Skillets
Preheat a baking steel or stone at 500°F for at least 45 minutes. Gluten-free dough benefits from immediate, fierce heat that sets the bottom quickly while steam inflates the center. If you have an older electric oven that cycles, allow extra preheating to stabilize the temperature. Transfer rounds to the hot surface and watch for bubbling; within a couple of minutes, you should see distinct swelling. Remove as soon as they’ve fully puffed and taken on the faintest golden hue, then cover with a towel to capture steam and keep them flexible.
Stovetop methods also shine for gluten-free pita. Heat a cast-iron skillet until a drop of water dances, lay in the round, and cook until bubbles appear. Flip and press gently with a spatula or a clean towel to encourage the pocket. The skillet method is merciful in summer, when you’d rather not blast the whole kitchen. A quick pass over a gas flame adds char if desired, but keep it brief to avoid drying.
As you settle into a rhythm—shape, bake, cover—you might start planning fillings. Boldly seasoned meats, crisp salads, and garlicky sauces feel right at home, and sometimes the best pairings emerge after glancing through a local shawarma menu for color and texture inspiration. The goal is balance: something juicy, something crunchy, something creamy, and a pita sturdy enough to carry it all.
Troubleshooting the Gluten-Free Pocket
If pitas refuse to puff, your dough may be under-hydrated or rolled too thin. Add a splash of water to the next batch and aim for that quarter-inch thickness. If they puff but crack, the dough likely lacked flexibility; increase psyllium slightly or add a teaspoon more oil. Pale, soft exteriors often signal insufficient heat; extend your preheat and, if using a skillet, allow a minute between rounds for the pan to rebound.
Gumminess can stem from too much binder or from underbaking. Dial back xanthan by a quarter teaspoon and let baked pitas rest under a towel for a few minutes, which redistributes moisture and softens the crumb. If the centers feel raw, bake a touch longer or finish in a hot skillet for 30 seconds per side to firm up without drying.
Flavor Notes and Add-Ins
Gluten-free pita is a welcoming canvas. Stir in a pinch of cumin or coriander for warmth, or sprinkle sesame seeds into the dough for toasty nuance. A small portion of teff flour adds a gentle chocolatey undertone and darker color, especially good with roasted vegetables. If you love whole-grain character, millet and sorghum deliver gentle sweetness without heaviness. For garlic-lovers, rub baked pitas with a halved clove and brush with a thin veil of olive oil—simple, aromatic, and perfect for weeknights.
Serving, Storage, and Reheating
Let pitas rest under a towel for a few minutes after baking so steam softens the interior. Split gently with a serrated knife if you want pockets, or leave whole for dipping. At room temperature, gluten-free pitas keep best for one day; freeze extras in stacks separated by parchment. To rewarm, wrap in foil and heat in a low oven or pass each pita over a hot skillet to revive suppleness. For a quick lunch near Naper Settlement or a break from errands along Route 59, thaw a couple, sear them briefly, and tuck in leftover roasted chicken with cucumber, tomato, and a lemony yogurt dressing.
Fitting the Bake into a Naperville Day
Gluten-free baking benefits from planning. Mix the dough after breakfast, let it hydrate while you take a Riverwalk loop, then shape and bake before dinner. If schedules collide, refrigerate the dough for a short rest and pick up later, remembering to warm it before shaping. For gatherings, make a double batch and keep pitas nestled in a towel-lined basket; the residual steam keeps them pliable while you set out fillings and invite everyone to assemble their own.
Frequently Asked Questions
Can I use only one gluten-free flour instead of a blend?
A single flour rarely provides the balance of starch, protein, and flavor needed for a strong pocket. Blends work because different components contribute unique strengths. If you prefer to DIY, combine rice flour with tapioca starch and either sorghum or millet, plus a binder like xanthan and psyllium.
How wet should the dough be?
Wetter than wheat dough. You’re aiming for a soft, pliable mass that holds together yet spreads slightly under its own weight. After a ten-minute rest, it should be shapeable with oiled hands. If it cracks when pressed, add a bit of water; if it oozes, add a spoonful of your blend.
Do I need a baking stone?
No, but it helps. A preheated inverted sheet pan or a cast-iron skillet can deliver similar results. The secret is sustained high heat, so give your equipment time to soak up that heat before the first round.
What keeps gluten-free pitas from tasting gritty?
Finely milled flours, full hydration, and adequate rest. Letting the dough sit for ten to fifteen minutes after mixing gives starches time to absorb water. A brief cold rest can further mellow texture and flavor.
How do I keep pitas soft after baking?
Trap steam. As each one comes off the stone or skillet, tuck it under a clean towel. This gentle sauna effect relaxes the crumb and creates a bendable pocket. Rewarm gently before serving to restore flexibility.
What fillings work best with gluten-free pitas?
Choose components that offer contrast and moisture without sogginess—crisp lettuce, tomato, cucumber, bright pickles, well-seasoned proteins, and sauces that cling rather than pool. The structure you’ve built will shine when fillings are thoughtfully layered.
When you’re ready to turn your next batch into a full meal, trust your palate and your routine. Let the dough rest while you chop vegetables, warm a skillet while you marinate chicken, and plate everything family-style. And if you want flavor ideas to jumpstart dinner, a quick glance at a Mediterranean menu can be just the spark your Naperville kitchen needs.