Every home baker in Naperville who has slid a round of dough onto a blazing-hot surface and watched it inflate like a lantern knows the rush I’m talking about. That sudden ballooning—the pocket forming in real time—feels like a tiny magic trick you can pull off on a Tuesday night before heading to the Riverwalk for an after-dinner stroll. Pita that puffs isn’t about luck; it’s about a dependable routine that respects heat, moisture, and timing. If you’ve struggled with flat breads that taste fine but won’t separate into pockets, this is your roadmap. And if you need inspiration for what to tuck into those perfect pockets once you’ve nailed the technique, a look across a tempting local shawarma menu can help you picture the finish line before you even preheat the oven.
I’ve baked pitas in drafty apartments near North Central College and in sunlight-bright suburban kitchens where the island doubles as a dough counter. The houses change, but the principles stay the same: build real heat, roll evenly, and move with purpose. Naperville’s seasonality affects how quickly dough ferments and how easily it dries. In the depths of February, the air inside is parched and dough needs a protective cover at every pause. In August, you may be blotting a bit of surface tackiness as humidity climbs. Think of puff as a conversation among flour, water, yeast, and your environment: your goal is to set the stage so steam can push apart the dough’s layers at exactly the right moment.
The Science of the Pocket: Layers, Steam, and Sealed Edges
Pita puffs because properly rested dough, rolled thinly and evenly, hits a surface so hot that steam forms instantaneously. That steam looks for the path of least resistance. If you have uniform thickness, you’ve created two layers that want to separate. If the rim is thicker than the middle, the seam may glue itself shut, giving steam nowhere to go. If the surface of the dough dried on the counter, the top skin can become too rigid to stretch, and it will crack rather than balloon.
To hedge your bets, divide and shape your dough into smooth balls, then cover them. Let them rest long enough to relax gluten—usually 15 to 25 minutes. When you roll, do so in confident, even strokes, rotating the dough with each pass of the pin. As you finish one disc, slip it under a barely damp towel while you roll the next. Those small gestures protect moisture, which turns into steam at the moment of truth.
Heat Strategy for Consistent Puff in Home Ovens
The most common pitfall is insufficient heat at the baking surface. Turn your oven to its highest bake setting and preheat a stone, steel, or inverted sheet pan for 45 to 60 minutes. If you’re working in a townhouse kitchen on a windy January night, don’t rush this part; the metal or stone needs time to saturate with energy. When a test drop of water flicked onto the surface sizzles and vanishes, you’ve reached a reliable launch pad.
Position matters. Mid-rack usually offers the right balance of bottom heat and overall oven temperature. If your pitas burn on the bottom before inflating, move the surface up a notch. If they won’t puff and remain pale, drop a notch and consider adding a minute or two to preheat. Load quickly, close the door, and resist peeking for at least 60 seconds. The oven has already done the hard work; your job is to preserve its momentum.
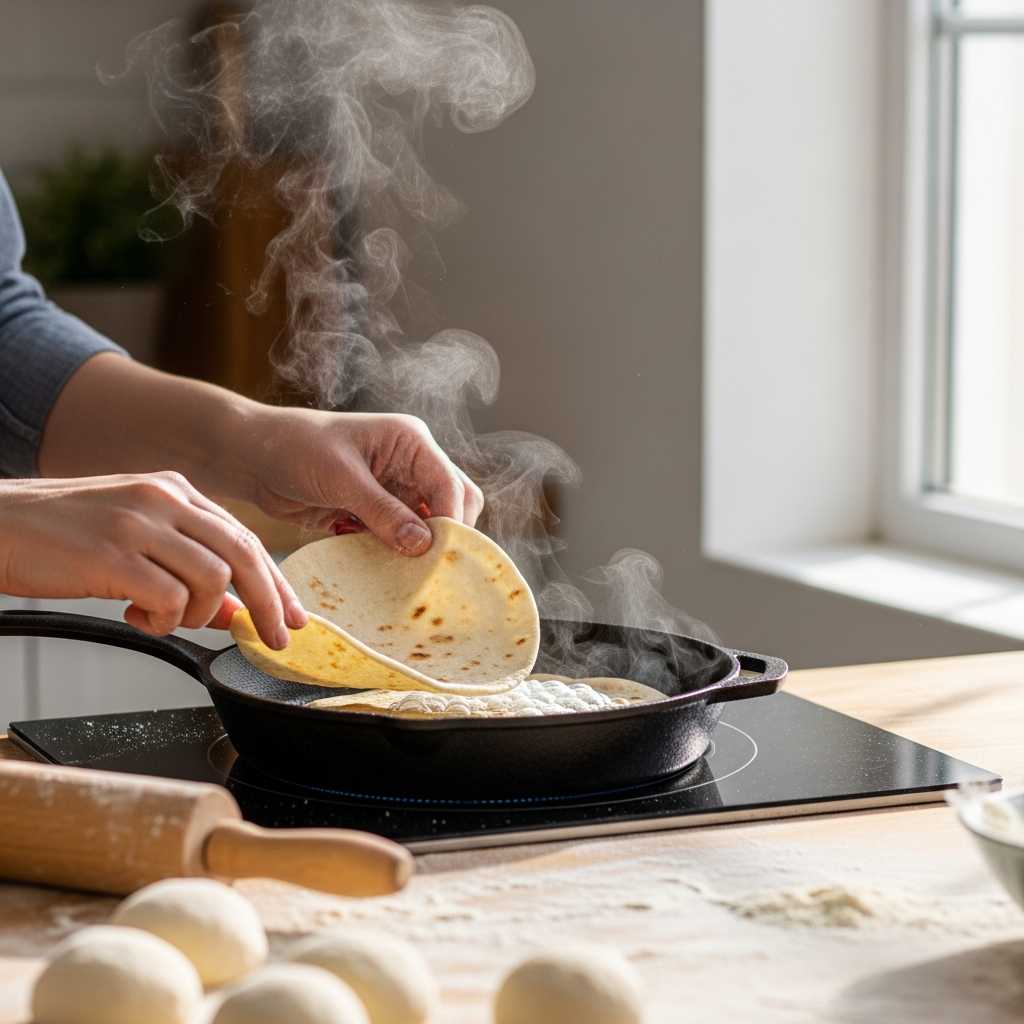
Stovetop Method and Hybrid Approaches
Plenty of Naperville cooks prefer a heavy cast-iron skillet for stovetop pitas. The rulebook is the same: high heat, even thickness, brief cook. Lay the disc on a hot pan, watch bubbles form, flip, then flip again when more bubbles appear. A gentle press encourages steam to inflate the center. For a hybrid approach—especially great if you’re working near a patio door in summer—start in a skillet to set color, then slide the disc onto a preheated stone in the oven to finish the puff.
Hydration, Gluten, and Dough Handling
A soft dough that borders on tacky is your friend here. If you go too dry, the dough resists rolling and dries on the counter. Too wet, and it sticks and stretches awkwardly. Aim for a dough that clings just slightly to your fingers after mixing, then tightens up after a short rest. Knead to smoothness, not stiffness. You’re not building a baguette’s armor; you’re creating a pliable shell that can trap steam without tearing.
If your kitchen is particularly dry—common during those bright, cold days when Centennial Beach is a memory until June—add a touch more water at mixing. If humidity is high, add a sprinkle of flour as you knead. Small adjustments shape big outcomes with pita.
Thickness and Rest: The Two Nonnegotiables
Roll to about an eighth of an inch and aim for evenness above all. The dough should feel relaxed beneath the pin; if it springs back, let it rest a few minutes and try again. After rolling, cover lightly while the oven cycles back to full heat between batches. This pause safeguards surface moisture, positioning you for a strong puff.
Flavor and Toppings Begin With the Dough
While technique matters most for inflation, don’t ignore taste. A spoonful of olive oil in the dough softens the bite. A bit of honey or sugar feeds color. A pinch of ground spices—za’atar dusted after baking, or a brush of garlic-lemon butter—turns a plain round into a centerpiece. And when you want guidance for what to pile into those pockets, browsing a local menu can spur combinations you might not have tried, from tangy pickles to creamy tahini and crisp, herb-bright salads.
Troubleshooting Flat Pita: A Naperville Checklist
If, despite your efforts, your pitas stay stubbornly flat, walk through this quick mental checklist. Was your oven stone truly roaring hot? If not, lengthen the preheat. Did your rolled discs dry on the counter? Cover them and roll fewer at a time. Were the edges thicker than the middle? Flip and even out the perimeter before baking. Did you load too many at once? Try baking one or two, close the door fast, and let the oven recover before the next batch. And finally, did you overbake to the point of crispness? Pull them as soon as the pocket sets and color kisses the surface.
Seasonal Adjustments for Midwest Weather
Our winters call for warmer water in the mix and patient proofing. Your dough will still double, but it might need a sunny window or a spot near the oven while it preheats. In summer, keep an eye on dough that sprints through its rise; overproofed dough can deflate in the oven. If your home turns muggy in July, dust lightly with flour as you roll and slide discs onto the heat quickly. Outdoors, a grill with a preheated stone transforms the backyard into a makeshift bakery and keeps the kitchen cool.
Serving, Storing, and Reviving the Puff
As soon as pitas puff and lightly brown, stack them in a towel-lined bowl. That little steam blanket keeps the crust tender. For leftovers, wrap well and keep at room temperature for a day or two, or freeze and thaw gently before reheating. To revive, warm a skillet or low oven and cover bread with a damp towel for a minute or two; the pockets return as if you baked them that afternoon.
A Routine You Can Repeat
Once you’ve had a few runs, make pita part of your weeknight rhythm. On a weekday, mix dough while coffee brews, let it rise during work-from-home hours, and bake in the last 20 minutes before dinner. On a Saturday, roll with kids or friends at the island, the afternoon sun slipping through the window as the oven hums. The method belongs to you now, and each batch will teach you a tiny new lesson about your kitchen, your tools, and your timing.
Frequently Asked Questions
What is the single most important factor for getting pita to puff?
Heat at the baking surface. A fully preheated stone or steel—hot enough to make a drop of water skitter and vanish—creates the burst of steam that separates the dough’s layers. Without that heat, even well-rolled dough can stay flat.
How thin should I roll the dough for guaranteed pockets?
About an eighth of an inch, but evenness matters more than the exact measurement. Rotate the dough as you roll, correct thick rims by flipping the disc, and keep the surface covered until you bake.
Why do my pitas crack instead of balloon?
The surface likely dried while waiting to bake, forming a rigid skin that can’t stretch. Cover rolled discs with a towel and work in smaller batches. If your kitchen is very dry, a lightly damp towel helps preserve moisture.
Can I combine stovetop and oven methods?
Yes. Start in a hot cast-iron skillet to develop color, then shift the disc onto a preheated stone in the oven to trigger a full puff. This hybrid method is excellent when you want char and a dependable pocket.
What flour is best for beginners?
Unbleached all-purpose flour is reliable and easy to handle. If you prefer a chewier pocket, blend in some bread flour. As you gain confidence, test a portion of whole wheat, adding a bit more water to keep the dough supple.
How do I store pita and keep the pocket intact?
Cool the breads wrapped in a towel, then store in an airtight bag at room temperature for a day or two. Reheat gently in a low oven or warm skillet under a damp towel to restore softness without crisping.
When your kitchen smells like warm wheat and you’ve got a stack of soft rounds waiting for dinner, you’re minutes from a memorable meal. Lay out a few bowls of crisp vegetables, roasted meats, and tangy sauces, or borrow ideas from a local shawarma menu to guide your spread. Invite a neighbor, set the table, and enjoy that first tear into a steamy pocket—the simplest proof that your hands and your home oven can conjure something extraordinary.