If you have ever wandered along the Riverwalk on a crisp Naperville morning and caught a whiff of warm bread from a home kitchen window, you already know how a simple flatbread can feel like the heartbeat of a neighborhood. Authentic pita is one of those breads that seems humble at first glance, yet turns every meal into a little celebration. In Naperville, where weeknights whirl between school commitments, commuter schedules, and gatherings that stretch from the East Highlands to Brookdale, a reliable pita routine brings calm and comfort. We will craft a recipe and method that works in real Naperville kitchens, on real Midwest weeknights, with the kind of results that make you proud to share. And when you are ready to see how your fresh pitas shine next to flame-kissed meats and crisp salads, take a peek at this Mediterranean menu for inspiration on classic pairings that help your bread truly sing.
What makes pita “authentic” here is not a single flour or a sacred technique but the balance of flavor, structure, and reliability. The pocket should puff to create a tender interior and a lightly blistered exterior, while the crumb stays soft enough for folding. You will learn not only the measurements but also the signals: how the dough should feel between your fingers, how the surface should look before rolling, and how the heat should smell in your oven or on your skillet right before the dough inflates like a balloon.
The soul of pita in Naperville
Naperville’s culinary personality reflects a comforting mix of family traditions and modern convenience. On any week, you might see neighbors exchanging sourdough starters across cul-de-sacs while others compare notes on which local markets carry the freshest flour. The city’s vibrant mix of backgrounds also means many versions of pita live side by side, from ultra-thin pocket bread ideal for sandwiches to thicker, pillowy rounds meant for ripping and dipping. Our goal is to offer a dependable approach that respects this variety while leaning into the essentials.
Because the Midwest seasons can swing from humid summers to dry, heated homes in winter, the same recipe can behave differently from month to month. That is why this method teaches you how to adjust water temperature, proofing time, and flour absorption so you can succeed when snow dusts the Riverwalk or when cicadas sing on summer evenings off 75th Street.
Ingredients that respect tradition
Classic pita relies on flour, water, yeast, and salt. A pinch of sugar or honey can help the yeast wake up, and a drizzle of olive oil can tenderize the crumb without turning the bread heavy. Many Naperville home bakers keep both all-purpose and bread flour on hand; a blend offers the perfect middle ground between tenderness and chew. If you prefer the nuttiness and fiber of whole wheat, you can substitute a portion of the flour, then dial in hydration for a dough that still puffs reliably.
Yeast matters, but not as much as confidence with the process. Instant yeast is convenient and forgiving, active dry yeast is traditional and just needs a brief bloom, and sourdough starter can add gentle tang if your schedule allows a slower rise. Whatever you choose, the proof is in the rise itself, and we will outline the cues that tell you it is time to shape.
Equipment that earns its keep
Your Naperville kitchen needs no specialty gadgets to make stellar pita. A sturdy mixing bowl, a bench scraper, a clean counter, and a rolling pin or even a wine bottle will do. For cooking, a preheated pizza stone, baking steel, cast-iron skillet, or even an inverted heavy sheet pan can generate enough heat to create the steam burst that forms the pocket. If your oven runs cool, use the top rack with the broiler for an extra kick; if it runs hot, protect the bread from scorching by watching the first batch closely.
The dough, measured for Midwest kitchens
Start with lukewarm water, just warm to the touch. In winter, Naperville kitchens can be cooler, so a slightly warmer water helps; in summer, cooler water prevents runaway fermentation. Mix water with yeast and a pinch of sugar, then add your flour and salt. Stir into a shaggy mass and let it rest for ten to twenty minutes, a pause known as autolyse, which allows flour to hydrate and gluten to begin forming. This rest builds extensibility, the quality that helps rounded dough balls roll into disks without shrinking back like rubber bands.
After the rest, knead until the dough turns smooth and elastic. Hand kneading takes patience but offers an opportunity to learn the feel: at first sticky and rough, then gradually satin-like. If using a stand mixer, keep speeds low and watch the dough rather than the clock. In a few minutes, it should pull from the bowl’s sides, clinging gently to the bottom. If it tears easily when stretched, knead a little longer; if it resists stretching and snaps back, rest it for five minutes and try again.
First rise: proofing in Illinois weather
Grease a bowl lightly and nestle the dough inside, turning it to coat so it does not dry. Cover and place it somewhere draft-free. On chilly days, an oven with just the light on makes a cozy proof box. In summer, a shaded counter works fine. You are looking for a dough that rises by about half to three-quarters, not necessarily a full doubling. Too much fermentation can weaken structure and undermine the dramatic puff later on.
When you press a finger gently into the dough, the indentation should spring back slowly, not immediately. That languid return signals a perfect window for shaping. Turn the dough onto a lightly floured surface and divide into portions roughly the size of small oranges. Shape each into a taut ball by tucking edges underneath and rotating against the counter to create surface tension. This step is essential; a smooth, even skin on each ball becomes a smooth, even disk.
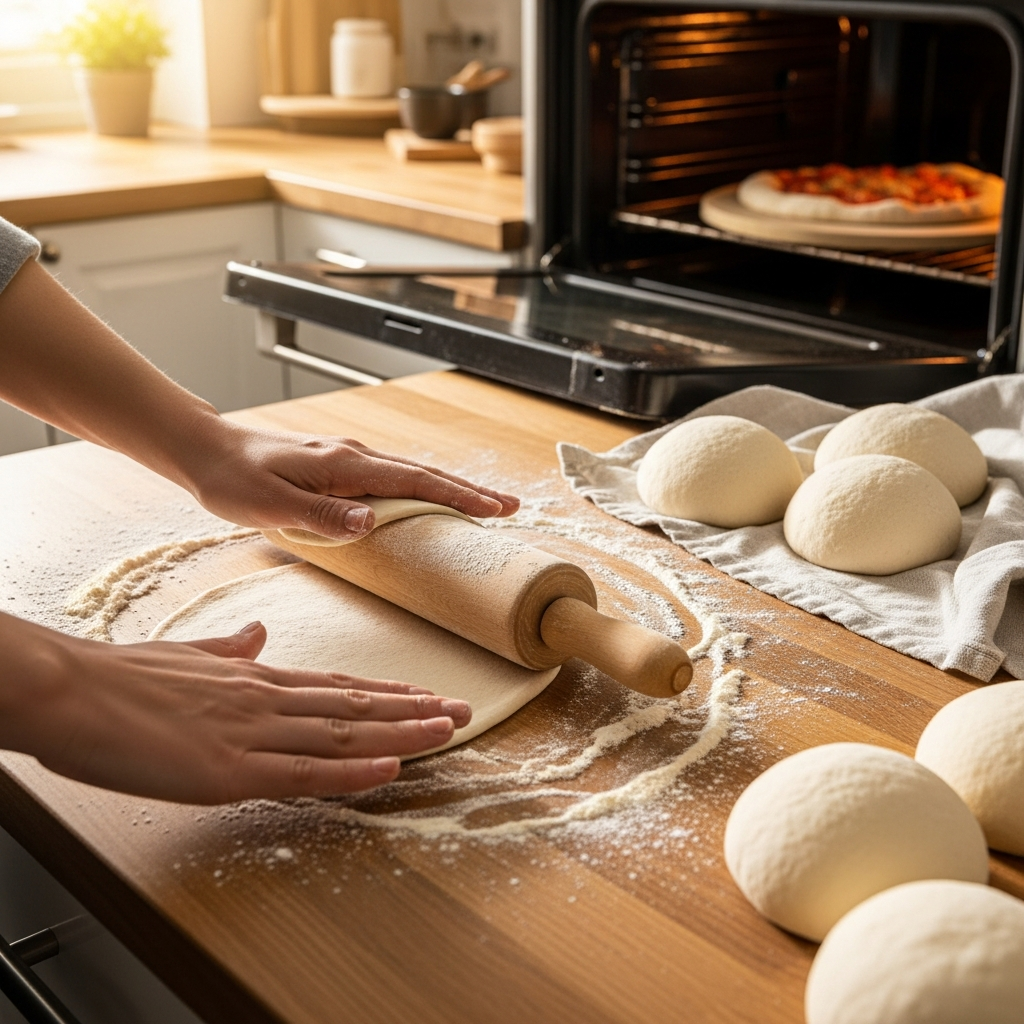
Bench rest and rolling technique
Let the dough balls relax under a clean towel for about fifteen minutes. This rest prevents shrinkage when you roll. Work with one piece at a time, dusting the counter and pin lightly with flour. Roll from the center outward, turning the dough a quarter turn every few strokes. Aim for an even thickness, a bit thicker than a tortilla, thinner than a naan—thin enough that a quick blast of heat can form steam within and separate the layers.
Resist the urge to over-flour the surface; too much raw flour can scorch. If the dough sticks, lift it and dust lightly, then continue. If it shrinks, rest again for five minutes. Cover rolled rounds with a towel so they do not skin over, which would inhibit puffing.
Cooking methods: oven, stone, steel, or skillet
Preheat your oven to its highest steady baking temperature, typically 500 to 550 degrees. If you have a baking stone or steel, place it on the center or upper rack and allow ample time for it to saturate with heat; fifteen to twenty minutes after the oven reaches temperature is a good baseline. Quickly slide a few rounds onto the hot surface. In a minute or two, you should see bubbles speckling the surface, then a dramatic balloon-like rise. Once fully puffed, bake another minute to set the pocket and lightly brown the bottom. If you prefer deeper char, leave them in slightly longer, but do not dry them out.
A cast-iron skillet offers another path. Heat it until a drop of water skitters and vanishes. Lay a disk in the dry pan, wait for air pockets to appear, then flip. Sometimes the flip triggers the full puff, other times a gentle press with a clean towel encourages the dome. The skillet method delivers a soft, tender pita with a hint of toastiness—perfect for quick dinners when you do not want to heat the whole kitchen.
In the middle of your cooking, pause and consider how you plan to serve these pitas. If you are setting out a spread with garlicky sauces, crisp salads, and spiced meats, you might gather ideas from a vibrant shawarma menu to shape the flavors that will fill those pockets. Let the scent of warm bread guide the balance of tangy pickles and creamy tahini, and you will find that even a simple weeknight becomes memorable.
Troubleshooting: why didn’t it puff?
When pita fails to puff, the culprit is usually uneven thickness or insufficient heat. Rolling too thick prevents steam from separating layers, while rolling too thin compromises structure. If the surface dried during shaping, a brittle skin can trap the steam and force it to escape through cracks. Another factor is fermentation: under-proofed dough is tight and resists expansion, whereas over-proofed dough can lack resilience. Before cooking, check that your oven or skillet is truly hot; a stone that has not fully preheated cannot deliver the instant vaporization required for a pocket.
If only some pitas puff, cheer the ones that did and treat the others as scoopers for dips or as wraps without a full cavity. Even seasoned bakers get a mixed batch now and then. Keep notes on dough feel, room temperature, and the heat source so the next bake lands closer to your ideal.
Flavor tweaks that stay true
For a subtle boost, whisk a spoonful of olive oil into the dough. It lends suppleness and a faint fruitiness without sacrificing the pocket. A bit of whole wheat—say, a quarter of the flour—adds nuttiness and a warm color. Seeds like nigella or sesame sprinkled on the surface before baking bring aroma and a pleasing contrast, especially for pitas destined to be torn and dipped rather than stuffed.
Salt deserves special mention. Under-salted dough tastes flat; over-salted tightens gluten and slows fermentation. Measure mindfully and taste a crumb after the first batch to tune your preference. Over time you will develop a baker’s intuition, a quiet certainty about what your dough wants on any given Naperville afternoon.
Storage, reheating, and freezing
Fresh pita is best the day it is made, but it keeps beautifully. Slip cooled pitas into a clean bag with minimal air and store at room temperature for a day or two. For longer storage, freeze them stacked with parchment between layers to prevent sticking. Reheat gently in a warm oven wrapped in a towel, or place directly on a low burner flame for a few seconds, flipping often, to revive pliability and aroma. Avoid microwaving too long, as it can toughen the crumb once it cools.
Leftovers are a canvas for invention. Cut into wedges and toast for crisp chips, brush with a whisper of olive oil and rub with garlic for a quick flatbread, or fill with eggs and herbs for a morning sandwich before a Saturday stroll along Jackson Avenue. Few breads repay a little imagination so generously.
Serving ideas born in Naperville kitchens
Authentic pita finds a place at everything from tailgate spreads near North Central College to slow Sunday dinners in Tall Grass. Build meze-style plates with hummus and roasted vegetables, or spoon warm, spiced chicken and bright pickles into pockets for a handheld feast. When neighbors drop by, a basket of just-baked pita wrapped in a towel becomes a centerpiece that invites conversation. The bread’s gentle chew and toasty notes elevate whatever it touches, from crisp salads to stew-like braises that need a good companion for swiping the bowl clean.
If you are packing lunches, layer sliced cucumbers, tomatoes, herbs, and a tangy dressing inside cooled pitas to keep everything tidy for the commuter train or a picnic at Commissioner’s Park. For a cozy dinner, char pitas lightly, spread with garlicky yogurt, and top with warm, spiced lentils for a vegetarian option that satisfies even devoted carnivores.
Frequently asked questions
How warm should my water be for the dough?
Aim for water that feels pleasantly warm to the touch, roughly the temperature of a comfortable bath. In winter, when kitchens are cooler in Naperville, slightly warmer water helps speed up the yeast’s activity. In summer, choose cooler water to prevent the dough from racing ahead. Consistency in feel matters more than chasing an exact number.
Do I need a baking stone or steel?
No, but strong bottom heat helps. A preheated stone or steel stores energy that transfers quickly to the dough, triggering the steam burst that creates a pocket. If you do not have one, invert a heavy sheet pan and preheat it until it is blazing hot; this makes sliding the dough on and off easier while delivering concentrated heat.
Why does my dough shrink back when I roll it?
Elastic dough needs time to relax. After dividing and rounding, let the dough balls rest under a towel. If the rolled round snaps back, set it aside for five minutes to relax, then continue. Adequate hydration and an autolyse rest at the start also make a big difference in extensibility.
Can I use whole wheat flour?
Absolutely. Start by substituting a quarter to a third of the flour with whole wheat and add a touch more water to keep the dough supple. Whole wheat can reduce puff if used exclusively, but careful rolling and strong heat still produce satisfying pockets with a deeper, nuttier flavor.
How do I know when to flip pita on a skillet?
Watch for small bubbles and faint color on the first side. When you see the earliest signs of lift, flip to expose the other side to the highest heat. Often the flip triggers the full dome, and a gentle press with a towel helps guide the expansion evenly.
What if my pitas do not have pockets?
They are still delicious. Use them as wraps, flatbreads, or tearable dippers. Learn from the batch by noting dough hydration, proofing time, and cooking surface temperature. Small adjustments—especially rolling thickness and full preheating—usually fix the issue next time.
Can I make the dough ahead?
Yes. Mix and knead, let it rise until just shy of double, then refrigerate for up to twenty-four hours. The cold rest deepens flavor. Bring to room temperature, divide, round, and proceed with shaping when you are ready to bake.
Ready to taste the real thing in Naperville?
Fire up your oven, warm your skillet, and let your kitchen fill with the aroma that gathers people around the table. When you want effortless pairing ideas for your freshly baked rounds, browse a local favorite’s Mediterranean menu, then come back to your counter to fold, fill, and feast. Whether you are planning a quiet dinner or feeding friends after a Riverwalk stroll, this authentic pita will make your Naperville home feel like the coziest spot in town.