There’s a special kind of pride that comes from pulling a soft, fluffy pita off your stovetop or out of your oven and watching it deflate gently like a little pillow. In Naperville, where busy evenings brush up against community events and the glow of the Riverwalk, a home-baked stack of pitas can transform an ordinary meal into something everyone lingers over. This guide is about consistency, confidence, and touch—how to create cloud-soft pita with a tender pocket that welcomes every filling you can imagine. And if you want inspiration for what to tuck inside those warm rounds, steal a glance at this enticing Mediterranean menu while your dough rests on the counter.
Softness starts in the dough and continues in the environment. The right balance of hydration, gluten development, and heat gives pita a texture that bends without cracking and springs back like a cushion. In Naperville, where winters are dry and summers can feel like the air is wearing a warm sweater, adapting your method to the season is the secret to reliable fluff. This is a dough you learn by feel. By the second or third batch, your hands will remember the texture better than any recipe card.
The science of softness
Fluffy pita needs a dough that’s well hydrated and elastic. Water transforms protein into gluten, and time allows that network to relax and stretch. An autolyse—mixing flour and water first, letting them sit—helps you more than extra kneading ever could. Adding a small amount of olive oil brings tenderness without sacrificing the pocket, while sugar or honey gives yeast a head start and encourages light browning.
Salt is a quiet hero. It strengthens gluten and rounds out flavor, but too much can slow the yeast too far. Measure carefully, then taste and adjust next time. Over a few bakes, you’ll dial in the level that suits your family’s palate, whether you live near Naper Boulevard or closer to 95th Street.
Choosing flour and yeast
All-purpose flour is friendly to beginners and produces soft results. Mixing in bread flour raises protein, giving the dough a little more chew and structural integrity, which can help pitas puff. Whole wheat contributes flavor and nutrition but can temper expansion; offset that by adding a bit more water and ensuring thorough heat. Instant yeast offers predictability; active dry yeast works beautifully if you bloom it first in warm water with a pinch of sugar. If you keep a sourdough starter in your Naperville kitchen, try a hybrid dough: a spoonful of starter plus a pinch of yeast lifts flavor and ensures a timely rise on weeknights.
Mix, rest, and knead with intention
Stir water, yeast, and a touch of sweetener; let it awaken into a creamy bloom. Add flour and salt, mixing until shaggy, then rest. This pause lets the flour drink, so the dough rolls later without fighting back. After resting, knead until the dough turns smooth and slightly tacky. It should cling to the bowl but release cleanly when you tug. If it tears on a windowpane test, knead a few minutes more. If it springs back harshly when pressed, give it time to relax.
In winter, when Naperville kitchens are cooler, use slightly warmer water and extend proofing. In summer, drop the water temp a bit and keep an eye on timing; over-proofed dough gets sleepy and fails to lift as dramatically on the heat.
Shaping without stress
Once the dough has risen by half to three-quarters, ease it onto a lightly floured counter and divide into equal pieces. Round them into tight balls by tucking edges under and rotating against the surface. Rest the balls under a towel for ten to fifteen minutes—this is your insurance policy against shrink-back when rolling.
Roll gently from the center outward, rotating the disk a quarter turn with each pass to maintain roundness. Aim for a uniform thickness, about the width of two stacked coins. Too thick and steam cannot separate the layers; too thin and the structure collapses. Dust minimally; excess flour scorches and dries the surface.
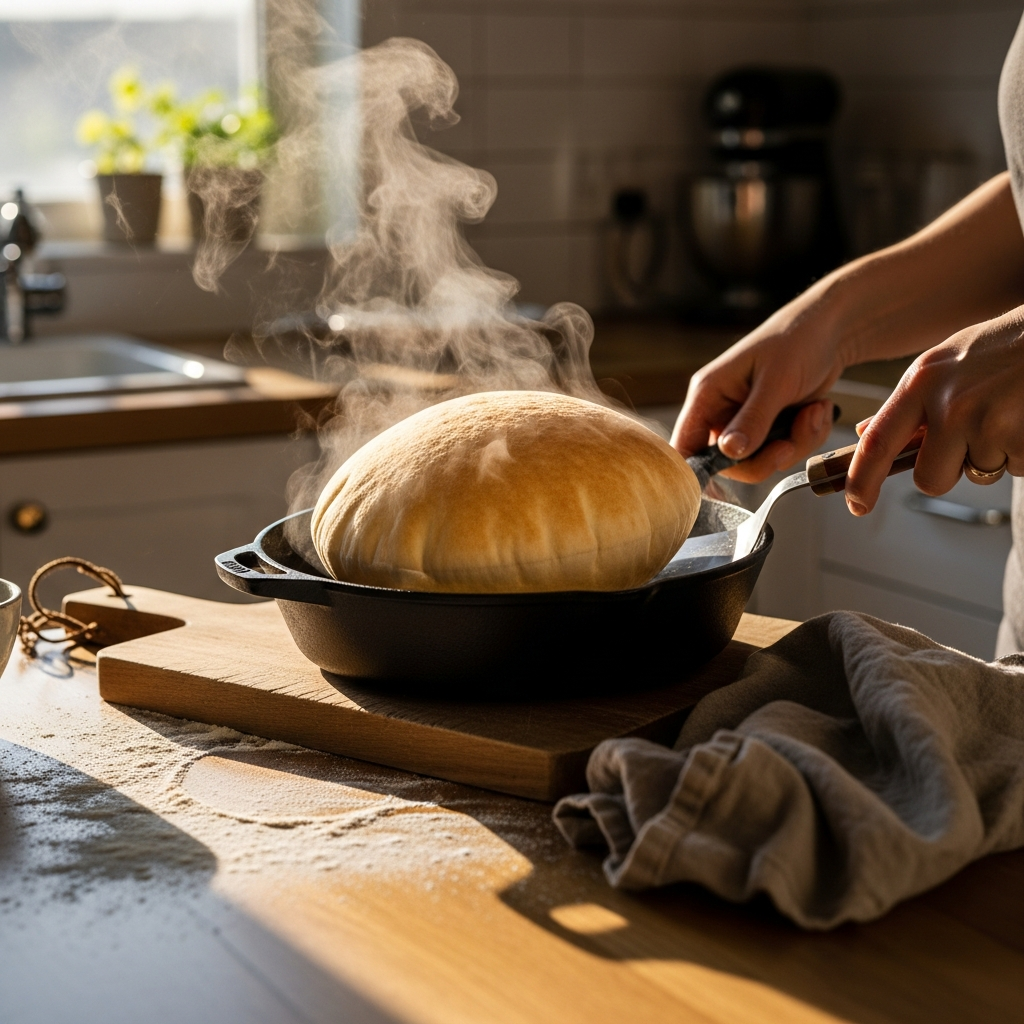
Heat: the engine of the puff
Softness depends on swift, intense heat that creates steam in the middle of the dough. A pizza stone or baking steel preheated at 500 to 550 degrees works wonders. Give it time—at least fifteen minutes after your oven beeps—to store deep heat. Slide a few disks on, close the door quickly, and watch for bubbles. In about a minute, the pita should balloon. Another minute sets the structure without drying it out.
If you use a skillet, pick a heavy one and preheat thoroughly. Lay the dough and wait for small blisters, then flip. Often the flip triggers lift, and a gentle press with a clean towel guides the dome. Skillet pitas are exceptionally tender, making them perfect for wraps eaten on a backyard porch while dusk settles over the neighborhood.
Mid-bake inspiration and fillings
While the first batch puffs, think about textures and bright contrasts for your eventual meal. Crunchy cucumbers, juicy tomatoes, and lemony dressings play beautifully with a pillow-soft pita. If you want to match that tenderness with protein that drips with flavor, peek at a crowd-pleasing shawarma menu and borrow the spirit of those combinations for your own kitchen lineup.
For vegetarians, spiced chickpeas and roasted eggplant make a lush filling that holds up well in a soft pocket. If you eat meat, marinated chicken or beef off the grill finds a ready home between warm layers. The key is balance: a creamy element, something crunchy, generous herbs, and seasoning that wakes up the palate.
Troubleshooting texture
If your pitas are soft but not fluffy, look at hydration first. A slightly wetter dough often irons out rough edges. If they are fluffy but dry, shorten the bake or reduce oven temperature a touch. If you cannot get a pocket, scrutinize heat and thickness. An underheated stone behaves like insulation rather than a launching pad. A disk that’s rolled unevenly—thick rim, thin center—will not balloon uniformly.
When pitas toughen after cooling, they likely spent a bit too long on the heat. Next time, pull them just as the puff sets. To refresh, warm them in a towel at low heat or pass them briefly over a low flame, flipping often.
Making naperville-friendly dough ahead
Weeknights move quickly, so plan-ahead dough is a gift. Mix, knead, and let it rise partially, then refrigerate overnight. Cold fermentation deepens flavor and fits a schedule that includes late pick-ups, sports, and club meetings. The next day, bring it to room temperature before dividing and rolling. The dough will feel more elastic and aromatic, and the pitas often brown more beautifully thanks to slow sugar development.
For the freezer, parbake—pull the pitas the moment they inflate. Cool, stack with parchment, freeze, and finish for a minute or two when you are ready to serve. This method preserves softness and speed without sacrificing that gratifying balloon moment.
Serving soft pitas like a local
Naperville tables know that warm bread is magnetic. Pile your pitas in a towel-lined basket and watch conversation gather. Offer a quick yogurt-garlic sauce, peppery greens, and pickled onions. Set out roasted vegetables or sliced grilled chicken if you have it. The key is to keep the bread front and center and let everything else play supporting roles. For school lunches, stuffed pitas travel well and feel more substantial than a typical sandwich.
On game day, char pitas lightly and fill with slow-cooked meats or spiced lentils. When friends bring dessert, swap plates for another round of warm bread and dipping. The casual rhythm suits the city’s friendly bustle, from Tall Grass to White Eagle.
Frequently asked questions
What makes pita soft rather than chewy?
Hydration and heat management. A well-hydrated dough that’s allowed to relax yields a tender crumb. Swift, high heat sets the pocket without driving out too much moisture. Oil adds a hint of tenderness, but too much undermines structure.
How thin should I roll the dough?
Uniformity matters more than an exact dimension. Aim for a disk just thicker than a tortilla, about the width of two stacked coins. Even thickness ensures the steam expands the interior evenly for a soft, fluffy pocket.
Can I make fluffy whole wheat pitas?
Yes. Replace a quarter to a third of the flour with whole wheat and add a bit more water. Give the dough time to hydrate, roll evenly, and ensure strong heat. You will get a softer result than you might expect, with lovely nutty flavor.
Do I need a stone or steel?
No, but they help. An inverted preheated sheet pan can mimic the effect. The goal is concentrated heat that converts interior moisture to steam in seconds, inflating the pita before it dries.
Why won’t my pitas puff?
Common culprits include low heat, uneven rolling, and over- or under-proofed dough. Confirm your cooking surface is truly hot, roll uniformly, and watch fermentation cues rather than the clock. Even seasoned bakers see the occasional flatbread—use it as a wrap and try again.
How should I store soft pitas?
Keep them in a towel or a loosely closed bag for short-term storage. For longer stints, freeze with parchment between layers and rewarm gently. Avoid sealing hot pitas in plastic, which traps moisture and can toughen the exterior as it cools.
Is there a dairy-enriched version for extra plushness?
Absolutely. Add a spoonful of yogurt or milk in place of some water for a slightly richer crumb. Keep the amount modest so the dough still puffs predictably. The result is a luxuriously soft pita that stays tender even as it cools.
Let your next meal float
Turn on the oven, warm the skillet, and invite that comforting bakery aroma into your home. When it is time to assemble dinner, borrow pairing ideas from a local favorite’s Mediterranean menu and fill your soft, fluffy pitas like a pro. From quiet weeknights to backyard gatherings, your Naperville kitchen is about to become everyone’s favorite stop.