There is a special satisfaction in pulling a puffed, golden pita from your own oven, especially on a crisp evening in Naperville when the Riverwalk lights reflect off the water and the kitchen windows fog from the heat inside. Authentic pita bread is simple on paper—flour, water, yeast, salt, sometimes a touch of sugar or olive oil—but it rewards patience, attention, and a keen feel for dough. Over years of baking in apartments near Washington Street and in larger suburban kitchens out by 95th, I have learned that a truly reliable recipe is as much about rhythm as it is about measurements. It fits our local climate and the way we cook here, flexing for cold winters and humid summers, and it leaves room for you to find your own favorite texture, pocket, and flavor. For inspiration on how you will put those pitas to work, it helps to look at a well-composed shawarma menu and picture the sauces and fillings you will tuck inside once the breads are cooling on your counter.
Before we dive into technique, let me set the scene. On a quiet Sunday, the late morning sun warms the kitchen, and the dough sits in a mixing bowl, just tacky enough to cling to your fingers but smooth enough to stretch without tearing. You can smell the yeast waking up and the faint sweetness of wheat. The first trick to authenticity is restraint. You do not want to over-enrich the dough; olive oil is fine in small amounts, but too much and you lose the classic pocket and the clean wheat flavor. What you are aiming for is elasticity and a gentle chew, something that will puff under heat and then settle into a soft, pliant round as it cools.
Finding Your Dough’s Sweet Spot
Years of Naperville baking have taught me to judge dough by feel. In winter, the air is drier indoors, and the dough benefits from a touch more water. In summer, humidity can turn a soft dough into a sticky one, so I adjust with a dusting of flour at the bench rather than changing the base hydration too much. If you are new to baking, start with a dough that is slightly tacky but not gluey. When you press it with a fingertip, it should spring back slowly and leave a faint impression. That means the gluten network is strong enough to trap steam and form the pocket later.
Resting is non-negotiable. After mixing and a brief knead, give the dough time to relax. In my kitchen near Downtown Naperville, I tuck the bowl beside the warmest window or on top of the refrigerator, where gentle warmth coaxes a steady rise. You want the dough to double in volume, not race to the finish. Slow fermentation develops flavor, and a slower rise also makes for a more cooperative dough when you divide and shape.
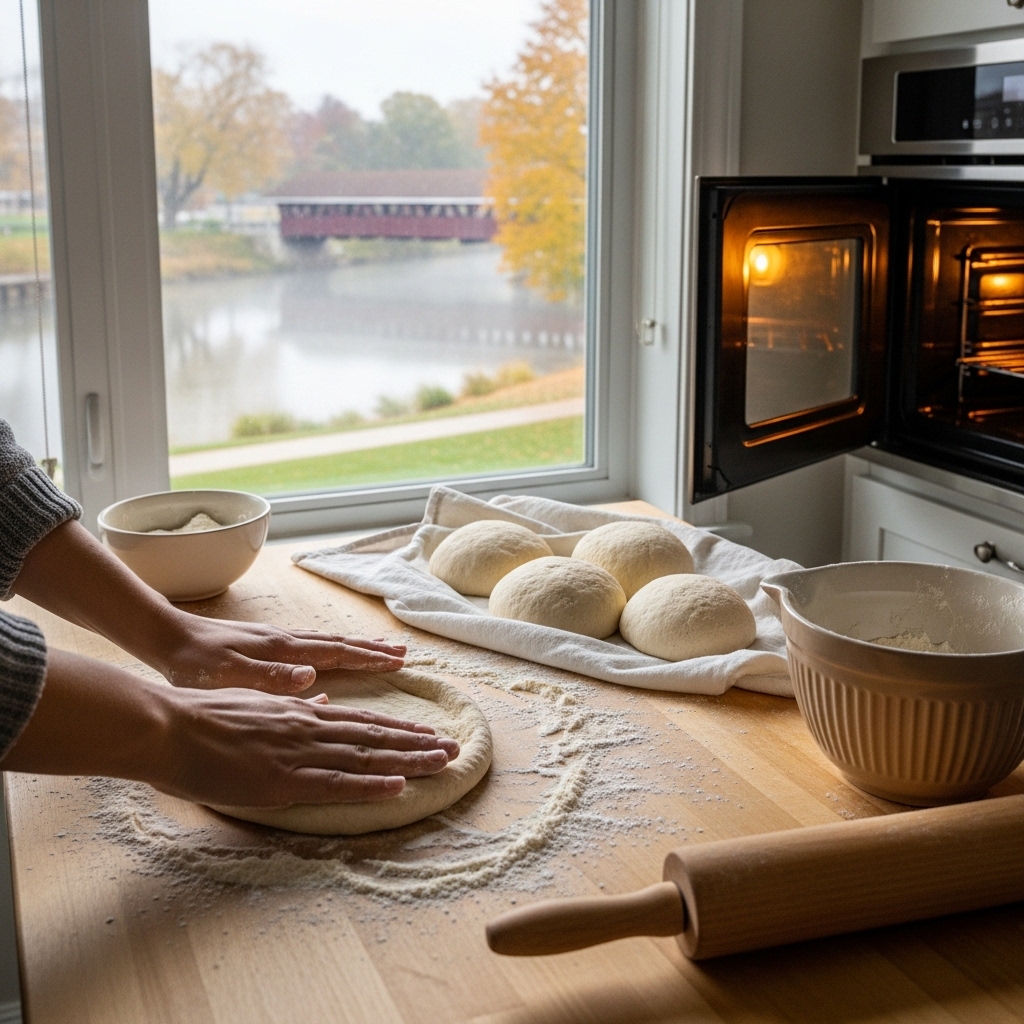
Shaping Rounds That Puff Reliably
When the dough has risen, turn it onto a lightly floured counter and divide it into equal pieces. Rolling each piece into a tight ball helps create tension on the surface, which promotes an even puff. Cover the balls with a clean towel and let them rest for ten to fifteen minutes. This rest relaxes the gluten so your rolling is more effective. Then, using a rolling pin, flatten each ball into a round about a quarter-inch thick. The edges and center should be even. If one area is much thinner, the steam will escape there and you may not get a full pocket.
Home ovens in Naperville vary, but most of us can reach temperatures that make excellent pita. Preheat your oven with a sturdy baking stone or an inverted cast-iron skillet inside. You want a ripping-hot surface to mimic the floor of a bakery oven. If your oven broiler is reliable, you can use it during the first minute to jumpstart the puff, then switch back to bake. Slide the rounds onto the hot surface and watch. The magic happens quickly, usually within two minutes, as the rounds balloon. Once they puff, give them another minute or so to build a touch of color, then pull them to a rack. They will deflate as they cool, but the pocket remains, ready for fillings or dips.
Flavor and Texture Tweaks for Local Tastes
Authenticity does not mean inflexibility. I often add a spoonful of yogurt to the dough when I want a softer, slightly tangy crumb—perfect for wraps that will be eaten on the walk from Central Park back toward the Riverwalk. For a nuttier flavor that still puffs well, blend in a portion of finely milled whole wheat flour, keeping most of the dough white to preserve the pocket. A pinch of sugar can encourage browning and feed the yeast on cold days, but use it sparingly; the wheat should speak for itself.
Salt matters more than you might think. Too little and the dough tastes flat; too much and the yeast struggles. I use fine sea salt and make sure it is fully dissolved in the water before mixing, which gives me even seasoning throughout. And when it comes to olive oil, I brush it lightly on the rounds right after they bake if I am serving the pitas as tear-and-dip bread. If the pitas are destined for stuffing, I usually skip the oil so the pocket stays clean and the bread holds up better to sauces.
Cooking on the Stovetop
If your oven is occupied—or you simply want the control that a stovetop provides—a heavy skillet or griddle does beautiful work. Heat it until a drop of water skitters across the surface, then lay down a rolled round. In a minute or two, bubbles appear. Flip the round and press gently with a towel to encourage puffing. The skillet method delivers lovely char spots and a slightly different texture: a touch denser than oven-baked, but aromatic and perfectly suited to stuffing. On busy weeknights, I often use the stovetop for speed and consistency.
There is a rhythm you fall into with stovetop pitas. As one round puffs, another is rolled. The kitchen fills with that toasted-wheat aroma, and family members wander in to “taste test.” Keep the cooked pitas wrapped in a towel to stay warm and supple. If they cool completely before you use them, a quick kiss of heat brings them back to life.
Storing and Reheating
Fresh pitas are best the day they are made, but they store well. Once cool, slide them into a bag and squeeze out extra air. They keep on the counter for a day and freeze beautifully. I like to place parchment between rounds before freezing so I can pull one or two at a time. To reheat, use a warm oven or a hot skillet for a brief refresh. Avoid long microwaving, which can toughen the crumb once the steam dissipates.
When your first batch is done, it is time to plan fillings. That is where local kitchens offer endless inspiration. I take cues from the way our neighborhood spots balance crisp, bright salads with deeply seasoned meats and creamy sauces. Even if you are cooking at home, a quick look at a trusted Mediterranean menu can spark ideas for how to combine flavors, textures, and temperatures in a single pocket.
Serving the Homemade Pita
For a gathering, lay out bowls of chopped cucumbers, tomatoes, fresh herbs, and pickles. Prepare a garlicky yogurt sauce or tahini with lemon. Grill chicken or roast cauliflower with warm spices. The goal is to create contrast: hot against cool, crunchy against soft, bright against savory. When people build their own pitas, the meal becomes collaborative, and the bread you baked becomes the star. In Naperville, where friends are always a short drive away, these make-your-own-pita nights tend to stretch late, with second and third rounds pulled from the towel as conversations drift from sports to weekend plans along the Riverwalk.
One of my favorite tricks is to use leftover pitas the next day for breakfast. Split and toast them lightly, then tuck in scrambled eggs, herbs, and a spoon of yogurt sauce. The same bread feels new again. If the pitas are a day or two old, brush with olive oil and grill briefly to revive the aroma. You will be surprised how the wheat comes back to the forefront with just a hint of heat.
What to Do When a Batch Does Not Puff
It happens to everyone. Maybe the dough was too dry, the oven not hot enough, or the rounds were rolled unevenly. If a batch refuses to puff, do not discard it. Those flatbreads make excellent wraps and great dippers for soups and stews. Learn from the feel: was the dough tight? Next time, add a touch more water and give it a longer rest. Was the oven hesitant? Let the stone preheat longer, or use the broiler for a brief kick of heat. Authenticity comes from repetition and small adjustments, and in Naperville’s changing seasons, those adjustments are part of the craft.
FAQ
Can I make pita dough the night before?
Yes. Mix the dough, knead briefly, and refrigerate it in a covered bowl. The slow, cool rise develops flavor and makes the dough easier to handle the next day. Let it warm on the counter before dividing and shaping so it relaxes and puffs well.
What flour works best for authentic pita?
Unbleached all-purpose flour performs beautifully and is widely available in Naperville. For a touch more structure, blend in a small amount of bread flour. If you add whole wheat, keep the majority white to preserve a reliable pocket.
How thin should I roll the rounds?
A quarter-inch thick is a dependable starting point. Too thin and the steam escapes; too thick and they become heavy. Aim for an even thickness from center to edge so the puff is uniform and the pocket opens cleanly.
Why do my pitas tear when I fill them?
They may be slightly underbaked or too hot when you split them. Let freshly baked pitas rest for a few minutes before opening, and if needed, give them a touch more color during baking to strengthen the walls of the pocket.
Is a baking stone necessary?
No, but a preheated heavy surface helps. An inverted cast-iron skillet or a thick sheet pan warmed thoroughly in the oven can mimic a stone’s heat and deliver a solid puff and good color.
You are now equipped to bake pitas that will make your kitchen smell like a neighborhood bakery and turn simple ingredients into a memorable meal. When you want fresh ideas for fillings and pairings, take a cue from a local favorite’s menu, then bring that inspiration home to your Naperville table and let your own pitas steal the show.