On cool Naperville mornings when the mist hangs low over the Riverwalk and the first joggers trace quiet paths along the DuPage, I love preheating the oven and letting the kitchen fill with the warm, malted scent of pita dough coming to life. There is something deeply local and immediate about bread you can mix, proof, and bake in a single afternoon, then bring still-warm to a patio table or tuck into a basket for a picnic on the lawn near Fredenhagen Park. Fresh pita—soft, tender, and just blistered enough to show its time against hot stone—thrives in our Midwestern kitchens, and the method is far more forgiving than many people think. When friends ask how to begin, I tell them that Naperville’s rhythms, from our breezy springs to humid summers, shape dough in subtle ways, but the pathway to success is clear: simple ingredients, steady heat, and mindful handling. And if you’re ever looking for inspiration on how to serve those pitas once they’re out of the oven, a quick glance at a vibrant local shawarma menu can spark delicious ideas you can recreate at home.
What I share here is more than a recipe; it’s a conversation with our climate, our grocers, and our weekends. Naperville’s markets and bakeries stock excellent flour, our tap water is friendly to yeast, and our home ovens can build enough heat to transform a thin disc of dough into a pocket. Your first batch won’t be your last, and once you’ve watched that initial dramatic puff, it becomes a small, celebratory ritual—like catching the first snowfall of the season on your sleeve or seeing the lights bloom along Water Street in winter. Pita baking turns a weekday night into an occasion and a Sunday meal into a memory.
Choosing Flour, Yeast, Water, and Salt That Suit Naperville Kitchens
Start with flour you like to bake with regularly. Standard unbleached all-purpose flour will deliver a soft, tender crumb and reliable puff, while bread flour yields a slightly chewier pocket with more structure. In our area, many cooks reach for national brands that are easy to find at grocery stores along Ogden Avenue or 75th Street, but there’s nothing wrong with mixing and matching if you’ve got a half bag of one and a fresh bag of another. The main idea is protein content: all-purpose typically settles in the 10 to 11 percent range, while bread flour stretches higher. If your first pitas come out a little too delicate, you can edge upward by swapping in a part bread flour on the next round.
As for yeast, any instant or active dry yeast you trust will do. In summer, when our kitchens hold a touch of humidity, yeast wakes quickly. In winter, when the air is drier, you may find that dough takes a few extra minutes to double, especially if your countertop is cool. Temperature is the conductor of fermentation, so consider a warm spot: atop a preheating oven, near a bright window if the sun is streaming, or on a shelf next to your coffee maker, which radiates a gentle warmth.
Water should be cool to the touch in summer, lukewarm in winter. When the furnace runs, dough can welcome slightly warmer water so the yeast gains a confident start. Salt matters both for taste and for managing fermentation. If your pitas taste flat, you likely under-salted; if the dough is sluggish to rise in your warm kitchen, too much salt might have tamped down the yeast’s energy. A balanced, measured hand gives flavor and structure without dulling the rise.
Mixing, Hydration, and the First Clues of Gluten
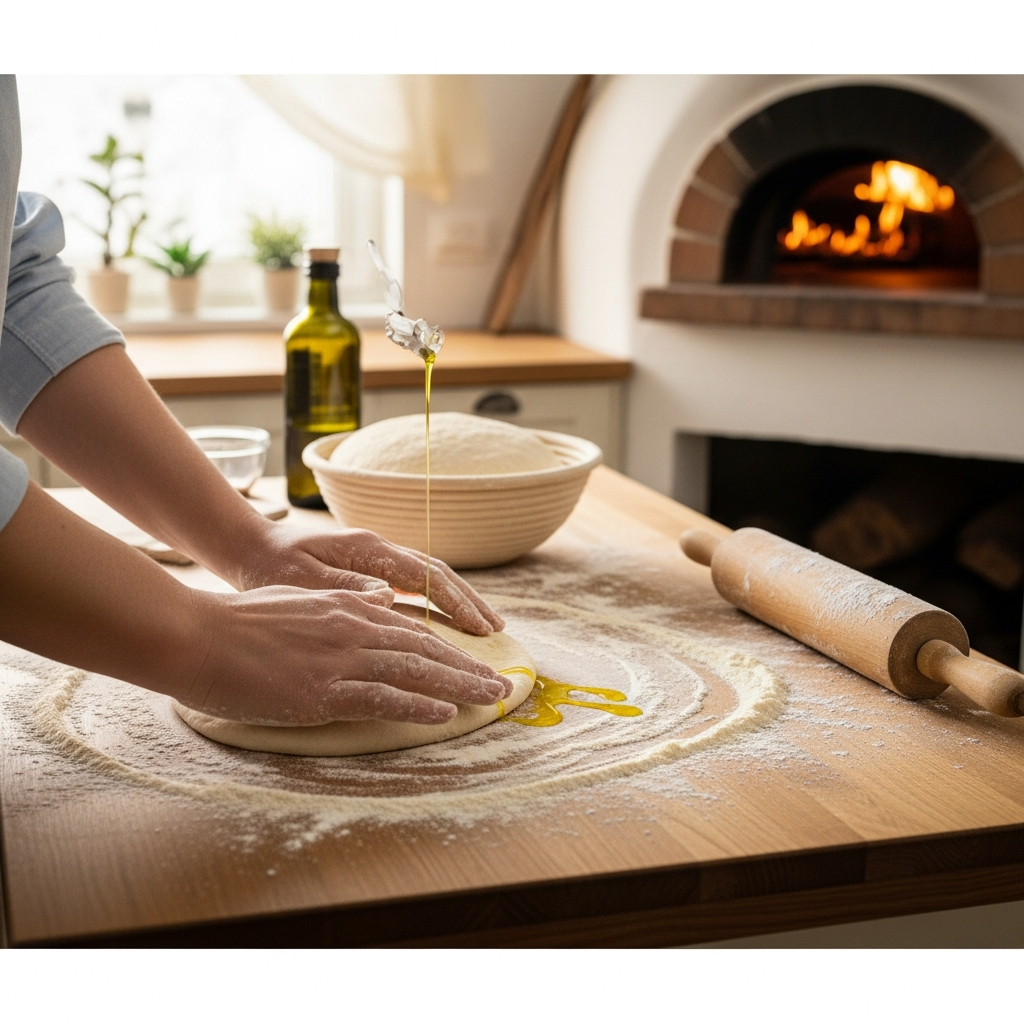
Pita dough should feel soft, supple, and barely tacky. I often aim for a hydration that borders on sticky after the first mix, knowing a short rest will relax the dough and make it easier to handle. Combine flour, yeast, and salt, then add water and a spoon or two of olive oil if you like a slightly more tender round. Stir until there are no dry pockets. The dough may look scruffy; that is fine. Let it rest for 10 minutes, covered. This short pause, sometimes called an autolyse in bread circles, lets flour drink in water and begin forming gluten connections on its own, which makes kneading more efficient.
After the rest, knead by hand on a lightly oiled surface or in a stand mixer with a dough hook. In Naperville’s winter months, I lean into a bit more kneading to coax strength because cooler doughs respond well to patient hands. In summer, when dough warms faster, I minimize friction so I don’t overheat the mass. You’re looking for smoothness more than absolute elasticity—pitas do not need the same rigidity as a baguette. When the dough forms a cohesive ball, bounces gently back when pressed, and can be stretched into a thin, translucent window without tearing, you’re in a solid place.
Bulk Fermentation and the Art of Waiting
Place the dough in a lightly oiled bowl, cover, and let it rise until roughly doubled. The timetable depends on season and room temperature, but an hour to ninety minutes is a fair average in most Naperville kitchens. If you have errands to run, you can tuck the dough into the refrigerator after forty-five minutes and let it rise more slowly; this cool rest deepens flavor and builds a little extra extensibility, which helps with rolling later.
When the dough has risen, turn it out and divide it into equal pieces. For sandwich-ready pitas, I like portions roughly the size of a small orange. Shape each piece into a tight, smooth ball by tucking the edges under and rolling with cupped hands. Place them under a light cover to rest for 20 minutes. This rest is a secret handshake between you and the dough—it allows the gluten to relax so you can roll thinly without springing back.
Rolling Thin and Even for Reliable Pockets
The pocket is born from even thickness and strong heat. On a lightly floured surface, roll each ball into a disc about an eighth of an inch thick. Spin the dough a quarter turn after each pass of the rolling pin to maintain a round shape and even the pressure. If the edges are thicker than the center, flip the dough and even it out; a too-thick rim will sometimes weigh the puff down and seal the steam where it shouldn’t be, leading to a lopsided bubble.
Keep the rolled discs covered with a towel so they don’t dry out while you prepare your baking surface. A hint of moisture on the surface encourages the first blast of steam that inflates the layers and makes the pocket, so avoid letting the discs sit uncovered for long stretches in a drafty kitchen. In summer, you’ll have a touch more forgiveness; in winter, cover promptly.
Heat Sources: Stone, Steel, Sheet Pan, or Cast Iron
Preheat your oven to its highest setting with a baking stone, steel, or even an inverted sheet pan on the middle rack. Give it a good 45 to 60 minutes to saturate with heat. I like to start on the stove by preheating a cast-iron skillet on medium-high while the oven climbs; it sets the tone for the bake to come. When the oven is blazing and your surface is hot enough to make a drop of water dance, carefully slide a disc onto it. In about 60 to 90 seconds, you should see the dough swell as trapped steam expands. If the puff lags, resist the urge to linger with the door open. Heat loss is the enemy; speed is your friend.
For stovetop pitas, lay a disc on the hot skillet and wait for a constellation of small bubbles to appear. Flip, watch for more bubbles, then flip again. A gentle press with a spatula can help coax the layers to separate. Stovetop pitas gather those signature char-speckled freckles and are a wonderful option when you don’t want to run the oven during a hot July afternoon.
Timing, Color, and Texture Cues
Perfect pitas stay soft while setting their structure. Once fully inflated, they often need just a moment or two more to fix the pocket. If you push too far, you’ll dry them out. Look for light browning at the spots where dough met the heat most directly and a gentle, pillowy give. Stack the finished breads in a towel-lined basket to keep them tender as they cool. The residual steam in that stack continues to condition the crumbs, much like a proofing box hugs dough with warmth and moisture.
Serving Ideas for Naperville Tables and Picnics
Fresh pita is a canvas for almost any season. In early spring, I love stuffing it with quickly sautéed asparagus and lemony chicken, or simply smearing it with labneh and topping with herbs from backyard planters. By midsummer, our farmers markets brim with tomatoes, cucumbers, and peppers that want nothing more than a drizzle of olive oil and a warm pocket to live in. When I host friends before a show at Pfeiffer Hall, I’ll set out a simple spread—grilled vegetables, shredded lettuce, pickled onions, a tahini-garlic drizzle—and watch as people build their own handheld suppers.
For flavor inspiration beyond the home pantry, I sometimes skim a local Mediterranean menu and translate the ideas into my kitchen. Thinly sliced, spice-rubbed chicken, crisp cucumbers, and a garlicky sauce; juicy lamb with chopped parsley and a touch of sumac; or roasted cauliflower with pomegranate and a quick yogurt dressing. Pita plays well with all of it. And if you’re serving a crowd, cut pitas into wedges and warm them briefly before plating; the aroma alone makes people lean toward the table.
Troubleshooting: Why Didn’t It Puff?
When pitas don’t puff, it’s almost always one of three issues: not enough heat, uneven thickness, or a dry surface. If your oven takes longer to preheat in winter, give it the time; a fully heated stone or steel is nonnegotiable for that initial burst of steam. If your rounds are too thick at the edges, try a touch more rolling, rotating the dough as you go. If the surface dried while you waited, cover the rounds and roll in smaller batches next time. You can also mist the dough lightly before baking, though it’s rarely necessary if the rest time is managed well.
Another silent factor is the transition from counter to heat. If you hesitate with the oven door open, you bleed away the very energy the dough needs to inflate. Work with purpose. Load one or two discs at a time, close the door, and let the oven do its work. Over time, you’ll develop a comfortable rhythm—roll, bake, stack, repeat.
Make-Ahead, Storage, and Reheating
Pita remains friendly hours after baking, but it truly shines the day it’s made. If you need to work ahead, refrigerate the dough after the first rise and shape the next day. You can also par-bake: give each round a brief, partial cook until it just begins to balloon, stack, cool, and finish the bake to order. For leftovers, store pitas well wrapped at room temperature for a day or two, or freeze for longer. To bring them back, a quick pass over a warm skillet or a short stint in a low oven under a damp towel restores their soft, pliant character surprisingly well.
Seasonal Rhythm and Local Touches
Naperville’s distinct seasons can be an ally in your pita-making practice. In the height of summer, when kitchens trend warm and time outdoors beckons, the dough ferments quickly and begs to be grilled in the backyard. A pizza stone placed on the grill turns your patio into an open-air bakery, and the smokiness flatters everything you tuck inside. Come winter, a longer, slower rise deepens flavor, and gathering around a kitchen island to roll and cook becomes its own entertainment. Put on a favorite playlist, pour tea, and let the house fill with the scent of baked wheat and olive oil.
Because our town’s food scene is rich with Middle Eastern, Mediterranean, and globally inspired kitchens, you can borrow ideas liberally and make them your own. Think herby sauces, crunchy pickles, lemony salads, and slow-cooked meats. Pita is a bridge, inviting those flavors home.
Frequently Asked Questions
How do I keep my pitas soft after baking?
Stack them in a towel-lined basket the instant they come off the heat. The gentle steam trapped in the stack keeps the crust tender. If they cool uncovered, they dry quickly and become leathery. A short reheat wrapped in a damp towel in a low oven also restores softness.
Why won’t my pitas puff in the oven?
Usually the baking surface isn’t hot enough or the rounds were rolled unevenly. Give your stone or steel a long preheat, roll to a consistent thinness, and load quickly to preserve heat. Ensuring the surface of the dough hasn’t dried out before baking also helps form the steam that creates the pocket.
Can I make pita on the stovetop only?
Absolutely. Use a well-heated cast-iron skillet and flip as bubbles appear. A gentle press with a spatula can encourage the pocket. Stovetop pitas develop beautiful char speckles and are perfect in summer when you want to avoid running a hot oven.
Is olive oil necessary in the dough?
No, but a small amount yields a more tender crumb and helps with handling. Traditional recipes vary; some are oil-free and rely entirely on flour, water, yeast, and salt. Try both and see which texture you prefer in your kitchen.
What flour works best for first-timers?
Unbleached all-purpose flour is forgiving and widely available at local stores. If you want a chewier pocket, blend in up to half bread flour. As you gain confidence, experiment with a portion of whole wheat for a nuttier flavor, adjusting hydration as needed.
How thin should I roll the dough?
About an eighth of an inch is a reliable target. Thicker rounds sometimes trap steam unevenly, while ultra-thin discs may crisp before a pocket sets. Rotate the dough as you roll so the perimeter and center remain the same thickness.
Can I freeze pita dough?
Yes. Portion after the first rise, lightly oil, and freeze on a tray before transferring to a bag. Thaw in the refrigerator overnight, let the pieces warm and relax, then roll and bake. The flavor holds up well, and you can bake exactly what you need.
When you’re ready to turn this walkthrough into dinner, invite a few neighbors, preheat that stone, and trust your hands. And if you want a creative nudge to decide what to tuck into those warm pockets, browse a local menu for pairings, then adapt them to what’s fresh in your fridge. To keep the energy going, share the task—someone rolls, someone bakes—and the kitchen becomes the warmest room in town.