There is a special kind of contentment that comes from watching a round of dough puff into a perfect pocket, especially when it happens in your own Naperville kitchen. Whether you cook in a sunlit condo near Downtown or a cozy ranch tucked along the tree-lined streets on the South Side, homemade pita turns ordinary meals into small celebrations. I have tested this process across seasons and ovens, and the beauty of it is that you can achieve bakery-quality results with equipment you already own. As you read through this guide, picture the meals you will assemble with your fresh bread, or, when you want a night off, picture the possibilities on a local favorite’s menu and let the flavors guide your shopping list.
Successful pita at home depends on three ideas: a supple dough, patient resting, and decisive heat. The dough should feel soft and accommodating under your hands, not stiff or dry. Resting the dough between steps gives gluten time to relax, making rolling easier and puffing more reliable. And heat—steady, robust, and ready—creates the steam that inflates the pocket. In Naperville, our seasonal swings influence these ideas more than you might think. Winter’s dry air may call for a touch more water and longer proofing, while summer’s humidity can shorten the rise and require a lighter hand with hydration. Once you learn to read your dough, the variables feel like familiar neighbors rather than unknowns.
Gathering Ingredients and Understanding Their Roles
Flour sets the foundation. All-purpose flour makes a tender, flexible pita that is forgiving for beginners, while bread flour lends chew and structure that supports dramatic puffing. Whole wheat adds flavor and nutrition but requires higher hydration and a bit more rest for the bran to soften. Yeast—instant or active dry—provides lift, and salt ensures flavor and strengthens gluten. A touch of sugar or honey encourages browning, though it is optional. Water is not just a liquid; it is the engine that turns into steam under high heat, creating the pocket you can fill with anything from crisp vegetables to warm, spiced meats.
In Naperville homes, tap water quality is consistent, but if you notice your dough tightening or behaving oddly, consider the temperature of the water first. Lukewarm water tends to produce the friendliest dough, especially in cooler months. In summer, slightly cooler water can slow things down just enough to keep the dough easy to handle.
Mixing, Kneading, and the First Rise
Start by combining water and yeast in a bowl, add part of the flour and all the salt, then incorporate the remaining flour gradually until the dough comes together. Knead until it becomes smooth and elastic. You are looking for a dough that springs back when pressed and stretches thinly without tearing easily. If the dough resists, pause for a minute to let it relax, then continue. The first rise should leave the dough puffy and slightly domed. In winter, consider placing the bowl near a warm spot in the kitchen or inside an off oven with the light on. In summer, keep it away from direct sun and check it early to prevent overproofing.
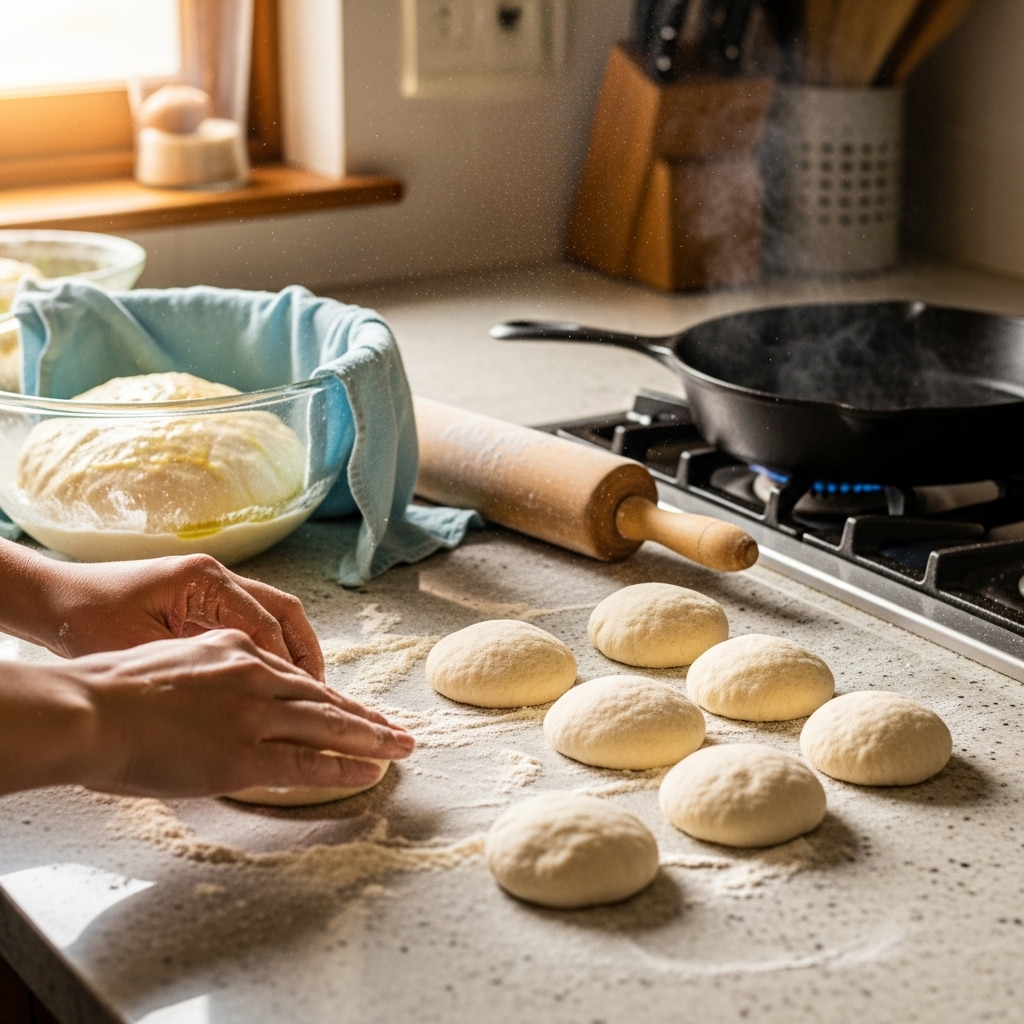
Dividing, Resting, and Rolling
Turn the risen dough onto a lightly floured counter and divide it into equal pieces. Shape each piece into a tight ball by cupping your hand and rolling it in small circles on the surface. Cover the balls and let them rest so gluten relaxes; this rest is your friend. Roll each ball into a disk of even thickness. If the edges spring back, give the dough another few minutes of rest. Roll the next piece while you wait; by the time you rotate through the stack, the earlier disks will be ready for the oven.
Oven and Stovetop Methods that Work in Real Homes
For oven baking, preheat thoroughly with a baking stone, steel, or inverted heavy sheet pan. The surface must be blazing hot. Slide a disk onto the surface and watch for the first signs of inflation. Within a minute or two, the dough should swell into a balloon. If it blisters and browns before puffing, adjust your rack position, extend the preheat, or spritz the surface lightly to nudge more steam. A convection fan can work for some ovens, but if you notice the surface setting too fast, switch convection off and rely on still heat.
On the stovetop, a cast-iron skillet shines. Heat it until a droplet of water skitters across the surface. Lay a disk in the skillet, wait for small bubbles, then flip. The pocket often forms dramatically after that first flip. Because the skillet loses a touch of heat with each piece, give it a moment to recover before adding the next. This rhythm keeps puffing consistent during a batch.
Troubleshooting in Naperville’s Seasons
In January, the air in many homes is dry from heating systems, which can lead to a dough that forms a skin while you roll. Keep the rounds covered with a towel and work efficiently. If the dough feels tight, increase hydration slightly or add a brief rest before rolling. In July and August, humidity can make dough sticky; dust lightly with flour and avoid overhydrating. Regardless of season, even thickness is your ally: thin spots can burst, and thick spots can resist puffing. Aim for a uniform disk and you will see more reliable pockets.
Flavor Variations and Serving Ideas
Once you master the base dough, explore flavors. Whole wheat adds nuttiness, sesame seeds bring toastiness, and a sprinkle of za’atar before baking perfumes the kitchen. For fillings, think about temperature contrast and texture. A swipe of cool yogurt sauce against warm, spiced chicken, the crunch of cucumbers with tender roasted eggplant, or a handful of herbs to brighten rich falafel—each choice transforms the same bread into a new meal. When you need fresh ideas for combinations that play well with pita, browsing a classic Mediterranean menu can spark inspiration and help you plan a balanced spread.
Serving a crowd? Bake ahead, wrap the pitas in a clean towel, and keep them in a low oven to stay supple. Set out bowls of vegetables, proteins, and sauces, and let everyone build their own. This approach turns dinner into an easy, convivial gathering that works as well for a weeknight as it does for a weekend birthday or game night.
Make-Ahead and Storage
You can refrigerate the dough after the first rise and bake the next day. This schedule fits neatly into busy weeks and school nights. Baked pitas freeze well; cool them completely, layer with parchment, and tuck them into a freezer bag. Reheat in a warm skillet or a low oven wrapped in a towel. The bread will regain its pliable charm and be ready to cradle whatever you are serving.
Questions and Answers
Why do some pitas puff dramatically while others stay flat?
Puffing depends on quick heat, even thickness, and surface moisture. If the rounds dry out or your baking surface is not hot enough, steam cannot separate the layers effectively. Keep the dough covered as you work, preheat thoroughly, and roll evenly for consistent results.
Can I make gluten-free pita at home?
Gluten-free pita requires a specialized approach because gluten provides the network that traps steam. Look for blends designed for flatbreads and expect a different texture. While a classic pocket may be difficult to achieve, you can still make soft, tasty rounds for wraps and dipping.
How do I avoid burning the bottoms when baking in the oven?
If the bottoms darken too quickly, move the rack up one level, reduce the temperature slightly, or add a thin layer of cornmeal to act as insulation. Check the first batch and calibrate from there; small adjustments usually solve the problem.
Is it better to bake with all-purpose or bread flour?
Both work well. All-purpose gives a softer bite, while bread flour supports a chewier texture and strong pocket formation. If you are unsure, try a half-and-half blend and decide which direction you prefer.
What is the best way to keep pitas soft for serving?
Stack the breads as they come off the heat and wrap them in a clean towel. The residual steam keeps them supple. If serving over an hour or two, store the wrapped stack in a very low oven and replenish with fresh pieces as you bake.
Homemade pita empowers you to turn pantry staples into meals that feel generous and warm. When your next busy day calls for something effortless, set the dough to rise while you handle other tasks, then bake and serve with simple fillings. If you are taking a night off from cooking, let a local favorite’s menu guide what you bring to the table, and pair it with your own fresh, warm bread for a Naperville meal that feels both comforting and complete.