Gluten-Free Pita in Naperville: Real Options That Work
Going gluten-free in Naperville doesn’t mean letting go of warm pockets and bold fillings. It means getting a bit more intentional about ingredients, technique, and where you source your bread. I’ve helped neighbors troubleshoot everything from crumbly store-bought rounds to ambitious home-baked batches, and the good news is that gluten-free pita is absolutely achievable—with chew, with structure, with a pocket that opens. It asks for patience and a few specialized ingredients, but once you dial it in, you can build sandwiches and scoops that rival their wheat-based cousins. For filling inspiration while you plan, a quick scan of a vibrant Mediterranean menu will give you flavors that marry naturally with gluten-free breads.
The first mindset shift is understanding that gluten-free dough behaves more like batter than traditional dough. Instead of kneading to develop gluten, you build structure through hydration balance, binders like psyllium husk or xanthan gum, and a strong blast of heat to set the pocket. Once you accept that stickiness and softness are part of the journey, your results improve dramatically.
Key Ingredients for Structure and Flavor
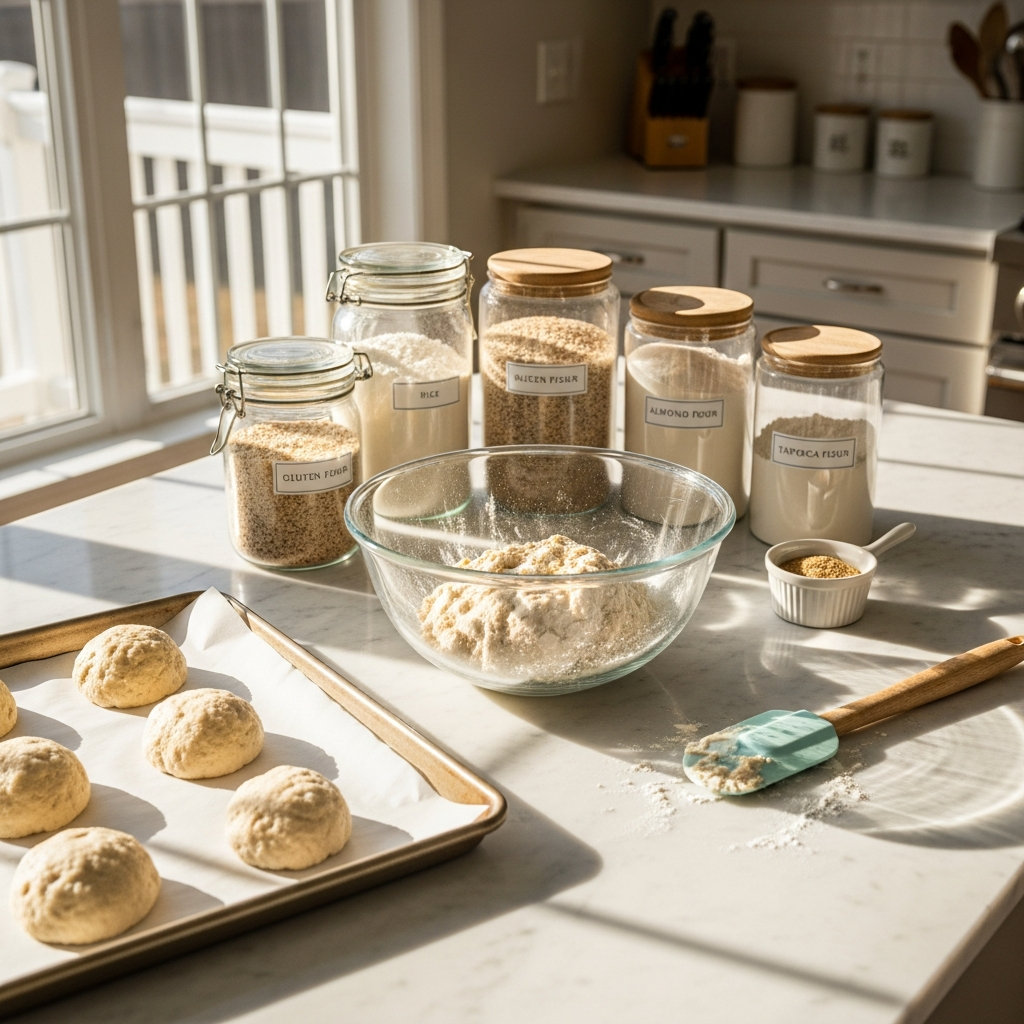
A good gluten-free pita blend balances starches for lift and lightness with whole-grain flours for flavor and nutrition. A common and effective base includes white rice flour for neutrality, tapioca or potato starch for stretch and browning, and sorghum or millet flour for a gentle, toasty note. Finely ground oat flour, if tolerated, adds tenderness. To replace gluten’s binding magic, psyllium husk powder is my first choice; it creates a gel that traps gas, helps dough hold shape, and contributes to a pleasantly bouncy crumb. Xanthan gum can assist, but I find psyllium offers a more natural bread-like chew.
Yeast remains essential for flavor and lift. Salt seasons and supports structure. Warm water activates both yeast and psyllium. A spoon of olive oil adds suppleness, and a touch of sugar can encourage browning. Keep everything fresh—stale flours or old psyllium can compromise results. In Naperville’s variable seasons, store your flours in airtight containers; humidity swings can accelerate rancidity in whole-grain gluten-free flours.
Mixing Technique: Embrace the Batter
Whisk dry ingredients thoroughly to distribute psyllium and salt evenly. Add warm water, oil, and yeast mixture, then beat until a thick batter forms. It should hold soft peaks—thicker than pancake batter, looser than wheat dough. Let it rest for 10 to 15 minutes to allow psyllium to hydrate fully. During this rest, the mixture will firm up into a malleable mass you can scoop and gently shape with oiled hands or a wet spatula.
Instead of traditional kneading, think in terms of gentle folding. Overmixing can paradoxically toughen the finished bread, while undermixing leads to uneven structure. After resting, divide into portions with an oiled scoop. Place onto lightly oiled parchment, then pat into rounds with damp hands. Aim for even thickness; uniformity is just as critical here as in wheat pitas.
Proofing and Handling
Gluten-free doughs don’t need the same long ferment to develop gluten, but they benefit from a short, warm proof to build gas and deepen flavor. Cover lightly and let rounds puff slightly—no more than 20 to 30 minutes in a warm spot. Overproofing can make them fragile to transfer and prone to collapsing. Because the dough is delicate, bake on the parchment; it becomes your transfer tool and prevents sticking.
Heat Management: Your Best Friend
The pocket effect still relies on intense heat. Preheat a baking stone, steel, or an inverted sheet pan at your oven’s maximum temperature for at least 30 minutes. Slide the parchment with rounds directly onto the hot surface. Watch closely; you’ll often see a gentle dome as steam pushes layers apart. If you don’t have a stone, a preheated heavy pan works—just keep the heat fierce. For stovetop versions, preheat a cast-iron skillet and transfer parchment-topped rounds onto it, peeling parchment away once set. Covering the skillet for a minute can trap heat and boost puff.
Managing Moisture for a Tender Crumb
Gluten-free flours are thirsty but can turn gummy if oversaturated. The goal is a hydrated dough that sets quickly under high heat. If your pitas feel dry or crack, increase water slightly next time or shorten proofing. If they bake gummy, reduce hydration a little and extend the bake by 30 to 60 seconds after puff. Remember that cooling firms the crumb; let breads rest a few minutes before splitting.
Flavor Additions Without Compromise
You can weave in herbs or mild spices without sabotaging structure. Finely chopped parsley or dill adds freshness. A pinch of ground cumin or coriander complements warm fillings. Sprinkle sesame seeds after baking with a light brush of oil; adding them to the batter can weigh the dough down if used liberally. If oat flour is part of your blend, ensure it’s certified gluten-free if cross-contact is a concern.
Buying Gluten-Free Pita Around Town
Local availability fluctuates, but awareness has grown, and more spots carry gluten-free pitas or wraps. When purchasing, check for clear labeling and ask about preparation practices to avoid cross-contact, especially if you have celiac disease. Individually wrapped products and dedicated toasters or warming methods help maintain safety. If you can, try a few brands side by side; texture varies widely, and personal preference is key.
Building Satisfying Gluten-Free Pita Meals
The architecture of a great gluten-free pita sandwich mirrors the classic version. Start with a creamy base—tahini, hummus, or a dairy-free yogurt sauce—to add moisture. Add fresh crunch with cucumbers, lettuce, or slaw. Choose a main: grilled chicken, roasted chickpeas, or spiced vegetables. Finish with acidity—lemon juice, pickled onions—and fresh herbs. Texture contrast is your ally; it elevates gluten-free breads by ensuring every bite has definition.
For inspiration that maps directly to bold, gluten-free-friendly flavors, browse a tempting shawarma menu and translate the combinations you like using safe ingredients. Many classic pairings—garlic, lemon, herbs, charred vegetables—are naturally gluten-free when prepared thoughtfully.
Storage and Reheating
Gluten-free pitas dry out faster than wheat versions. Store cooled breads in airtight bags with a small piece of parchment between them. Rewarm gently in a damp towel in a low oven or quickly on a hot skillet. If freezing, do so the day you bake for best texture. Reheat straight from frozen to avoid drying during thaw.
Common Pitfalls and How to Avoid Them
Cracking usually signals low hydration or overbaking. Increase water slightly and shorten cook time by increments. Gummy centers suggest too much water, insufficient heat, or cutting into the bread while it’s still hot; let it rest to set the crumb. Lack of puff often traces back to uneven thickness or an oven that wasn’t fully preheated. Patience with preheat pays dividends here.
Hosting with Gluten-Free Confidence
If you’re feeding a mixed group, serve gluten-free pitas on a separate board with dedicated tongs. Place sauces and toppings in clearly marked bowls. Build a flow that minimizes cross-contact—gluten-free diners first, then everyone else. This small choreography lets you host generously without stress, and your guests will feel cared for.
Frequently Asked Questions
Can gluten-free pita really develop a pocket?
Yes. With adequate hydration, psyllium for structure, and high heat, you can achieve a satisfying pocket or at least a pronounced separation that holds fillings well. Uniform thickness and a fully preheated stone or skillet are crucial.
What’s the best flour blend for gluten-free pita?
A balanced blend often includes white rice flour, sorghum or millet for flavor, and tapioca or potato starch for elasticity. Psyllium husk powder binds and improves chew. Ratios vary by brand and climate; keep notes as you refine.
Is xanthan gum necessary if I use psyllium?
Not always. Psyllium alone can provide excellent structure. Some bakers combine small amounts of xanthan with psyllium for added resilience, but too much can make the crumb rubbery. Start with psyllium and adjust only if needed.
How do I prevent dryness in gluten-free pitas?
Use adequate hydration, avoid overbaking, and rewarm with a bit of steam—wrapped in a damp towel or briefly on a hot skillet. Adding a touch of oil to the dough can also help retain moisture.
Can I make the dough ahead?
Yes. Gluten-free doughs often benefit from a short chill after mixing to hydrate fully. Shape after chilling, proof briefly, and bake hot. Baked pitas freeze well; reheat directly from frozen for best texture.
What about cross-contact when dining out?
Ask how gluten-free pitas are stored and warmed, and whether separate utensils and surfaces are used. Clear communication protects you and helps restaurants improve their practices for future guests.
Are oats safe in gluten-free pita?
Only if certified gluten-free and tolerated by the individual. Some people with celiac disease avoid oats even when certified. If you include them, monitor how you feel and choose products with clear labeling.
Do gluten-free pitas have the same nutrition as wheat pitas?
Nutritional profiles vary by blend. Whole-grain gluten-free flours like sorghum or millet add fiber and micronutrients, while starch-heavy blends may be lighter. Building meals with protein, vegetables, and healthy fats balances any differences.
Bring Gluten-Free Pockets to Your Table
Gluten-free pita is not a compromise; it’s a craft. With the right blend, hot equipment, and a little practice, you can enjoy warm, flexible pockets that carry the bright, satisfying flavors you love. When you’re ready to plan a week of fillings, take a peek at this flavorful menu and build combinations that fit your needs without giving up pleasure.