The Quest for the Perfect Puff in Naperville
If there’s a single party trick that turns a simple dinner into a small celebration, it’s sliding a round of dough into intense heat and watching it bloom into a golden balloon. In Naperville, we chase that perfect puff through the seasons—adjusting to humid Julys, crisp Octobers, and furnace-dry Januaries. The technique isn’t a secret handshake; it’s a set of cues your senses can learn. I’ve taught neighbors and friends from Riverwalk condos to west-side ranches, and every one of them can now tell you what the dough should look like and how the oven should feel. As we dig into the how and why, keep an eye out for filling ideas too; a quick glance at a well-loved Mediterranean menu helps you picture what those pockets will carry when the puff delivers.
Perfect puff begins long before the bread meets heat. It starts with flour selection, hydration, fermentation, and shaping discipline. But as important as the steps are, your thoughtfulness matters most—choosing when to pause, when to push, and when to let the dough do its quiet work. The reward is a stack of tender pitas that open cleanly and rewarm beautifully, the kind you can split with your fingertips and stuff without tearing.
Understanding Puff: Steam, Structure, and Surface Heat
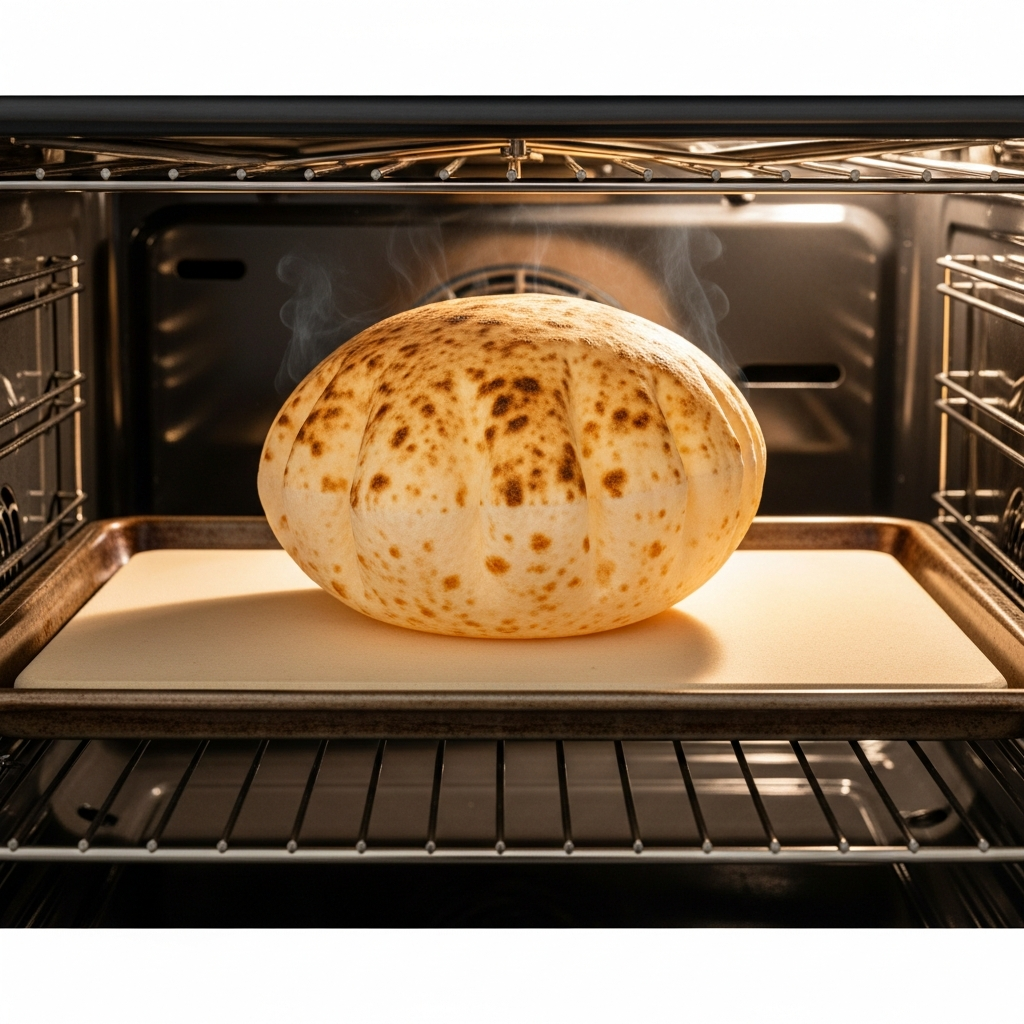
The puff is driven by steam trapped between two layers of dough that separate as the outer shell sets. For that to happen, three conditions must align. First, hydration must be sufficient to create ample steam. Second, gluten structure must be strong yet flexible, so the layers stretch without rupturing. Third, surface heat must be intense enough to seal the exterior before internal steam escapes. If even one of these lags, you get a flatbread instead of a pocket—tasty, but not the show you’re after.
Naperville’s environment supports all three when you manage variables smartly. Our municipal water is consistent, which helps dough behavior. The moderate altitude means you won’t battle low-pressure overproofing. Your main job is to balance hydration with seasons—perhaps a touch more flour on humid days, and a splash more water when the indoor air is dry.
Flour, Hydration, and the Feel of the Dough
For reliable puff, I prefer a blend leaning toward bread flour, with its higher protein content, to develop strong gluten. All-purpose flour brings tenderness. Start at about 64 percent hydration by weight, then adjust by feel. After mixing, the dough should be slightly tacky but not cling to your fingers aggressively. During kneading, it will tighten and become satiny. If it remains shaggy, give it a brief rest—autolyse—then knead again. These short rests are magic; they let the flour fully drink the water and the gluten align with less effort from you.
Salt strengthens gluten and modulates fermentation. Don’t skimp. Yeast—instant or active dry—should smell alive after a few minutes in warm water. I prefer mixing by hand because it teaches your senses. You’ll learn what under-kneaded or over-floured dough feels like faster than any recipe note can tell you.
Fermentation: The Quiet Architect of Puff
Let the dough rise until doubled, not by the clock but by volume. In Naperville winters, I proof near a warm oven with just the light on. In summer, I move the bowl away from direct sun and shorten the rise slightly. After the first rise, gently degas and divide into eight equal pieces for classic size. Shape into taut balls, cover, and rest for twenty minutes. This relaxation prevents snap-back when rolling and yields the even thickness that puff demands.
Rolling Technique: Uniformity Is Destiny
Roll each ball into a round about one-eighth of an inch thick, keeping thickness uniform across the circle. Rotate the dough a quarter turn between passes of the pin. If the dough sticks, dust lightly. If it fights back, let it rest. Authentic puff relies on even thickness so steam pushes the layers apart consistently rather than erupting through a thin edge.
Heat Strategy: Stone, Steel, Skillet, and Grill
Preheat a baking stone or steel at your oven’s maximum temperature for at least 30 minutes. That stored heat creates the quick shock needed to seal the surface. If you’re baking on an inverted sheet pan, give it ample preheat time too. Load one to two pitas at a time to keep heat levels high. Watch for swelling at the two-minute mark; a full balloon signals success. Flip briefly to set the second side.
For stovetop puffing, a cast-iron skillet delivers focused heat. Place the round, wait for early bubbles, flip once, then again, and gently press with a folded towel to encourage expansion. On summer evenings, the grill is your friend. Heat a griddle on the grates, close the lid to create an oven effect, and bake pitas quickly without turning the kitchen into a sauna.
Timing the Bake
Overbaking dries the crumb and makes splitting harder. As soon as the pita inflates and picks up light golden freckles, it’s close to done. The residual heat will finish the interior structure. Stack the breads in a towel-lined basket to keep them supple as you bake the rest. That small steam bath inside the towel maintains the plush texture you want for stuffing later.
Troubleshooting the Usual Suspects
No puff? Check heat first. If you opened the oven door too long while loading, the stone temperature may have dropped. Work quickly or bake fewer at a time. If you see partial swelling with tears, your dough may be too dry or over-kneaded. Add a touch more water next batch, or shorten kneading. If pitas char underneath while staying pale on top, move the rack higher or add parchment as a shield.
Seasonal Adjustments for Naperville Kitchens
January air can be dry enough to rob dough of moisture. In winter, I bump hydration a couple of percent and cover dough tightly during rests. In August, the opposite is true; humidity slackens the dough, so I dust a bit more flour during shaping and shorten proof times slightly. Keep notes by season, and you’ll anticipate what the day will ask of you before you mix the first cup of water.
Flavor Without Compromising Puff
A teaspoon of sugar or honey feeds yeast and deepens browning. A spoonful of olive oil adds tenderness but can slightly reduce puff if you overdo it. If you crave whole grain, start with one-third whole wheat and nudge hydration upward. Fresh herbs can be kneaded in lightly for aroma without affecting structure. Spices like za’atar are best sprinkled after baking with a brush of oil rather than mixed into the dough, which can interfere with gluten strands if used heavily.
What to Put in a Perfectly Puffed Pita
A good pocket deserves a vivid filling. I often grill chicken thighs marinated with lemon and garlic, then tuck in sliced cucumber and tomatoes with a generous spoon of yogurt sauce. In fall, roasted cauliflower with tahini and pickled onions brings warmth and tang. For vegetarian nights, crisp falafel or charred mushrooms add heft. If you want inspiration that maps directly onto the flavors pita loves, skim through a savory shawarma menu and imagine how you’ll translate those ideas at home.
Make-Ahead Workflow for Busy Weeks
On Sundays, I mix a double batch, let it rise, divide, and refrigerate the dough balls in a covered container. Weeknights, I pull out what I need, let them warm for 45 minutes, roll, and bake. Fresh bread becomes no more complicated than heating a skillet. Leftover pitas refresh beautifully under a damp towel in a low oven or directly on a hot pan for a few seconds per side.
Entertaining, Family-Style
Lay out a board with warm pitas, grilled meats or vegetables, crisp greens, and creamy sauces, and you’ve built a party that practically hosts itself. The interactive nature keeps conversation lively, and the visual of a steaming pocket is universally appealing. Make the first couple of pitas yourself, then invite guests to give it a try; the shared discovery of the puff turns dinner into a memory.
Frequently Asked Questions
What is the single most important factor for puff?
Heat. A fiercely hot stone or skillet seals the surface quickly so internal steam can lift the layers apart. Without that early seal, moisture escapes and the pocket won’t form.
How thick should I roll the dough?
About one-eighth of an inch, with even thickness across the round. Uniformity lets steam expand the pocket consistently rather than seek out thin spots to burst through.
Why do my pitas tear while puffing?
Usually the dough is too dry or overworked. Increase hydration slightly and knead just until smooth. Also avoid heavy flouring during rolling, which can toughen the surface.
Can I make gluten-free pitas that still puff?
Yes, with specialized blends and binders like psyllium husk. The technique differs, but you can achieve a satisfying pocket-like structure. Hydration and heat remain crucial.
Is oil necessary?
No. Many of the best pitas contain no oil in the dough. Adequate hydration and proper kneading produce a supple crumb. A light brush of oil after baking adds sheen and flavor without affecting puff.
Should I proof the rolled rounds before baking?
A brief rest of 5 to 10 minutes after rolling can help relax gluten and encourage even puff, but avoid a full second rise that could make the dough too airy to handle.
How do I reheat without drying?
Wrap pitas in a slightly damp towel and warm in a low oven, or place directly on a hot skillet for a few seconds per side. The goal is to re-soften, not re-bake.
Can I freeze the dough or baked pitas?
Both freeze well. Freeze dough balls after the first rise; thaw gently and let them warm before rolling. Freeze baked pitas with parchment between them; reheat on a hot pan straight from the freezer.
Bring the Puff to Your Table
Perfectly puffed pitas are within reach of any Naperville kitchen. Trust your senses, keep the heat high, and let the dough teach you what it needs. When those balloons swell and settle into pockets, you’ll have a canvas for the flavors you love. For ideas that marry effortlessly with fresh bread, take a look at this flavorful menu and start planning your next spread.