If you have ever walked the Naperville Riverwalk on a breezy evening and felt inspired to bring a little warmth back to your kitchen, you already understand the soul of homemade pita bread. This is a flatbread that rewards attentiveness more than gadgetry, and in Naperville—where summers run humid and winters turn crisp and dry—learning to coax perfect puff and tender chew from a simple dough becomes a kind of local ritual. In the same way we pick our favorite corner coffee spot or become loyal to a Saturday stall at the 5th Avenue Station farmers market, we fine-tune our pita routine until it feels unmistakably our own. Along the way, we lean on classic technique, a hot pan or stone, and the confidence that even a first attempt will taste better than anything sealed in plastic. And for days when you’re pairing your fresh bread with something savory and spiced, it never hurts to peek at a local Mediterranean menu for flavor inspiration.
In my Naperville kitchen, I’ve tested pita in July heat and in January chill, toggling water temperatures, adjusting hydration, and playing with rest times to fit a busy suburban schedule. The fun begins by recognizing how the dough reflects the season. On sultry afternoons, the dough loosens quickly, stretching easily like a friendly handshake. In the depths of winter, when the DuPage River is edged with ice and your home is drier, the dough seems to ask for a sip more water and a longer nap. Once you start noticing these cues, you’ll bake like a local pro, using feel as much as formulas.
Why Pita Bread Feels at Home in Naperville
Naperville is a town that loves gatherings—block parties, backyard grilling, park picnics, and casual spreads around a coffee table on Sunday afternoons. Pita fits right in because it’s adaptable and participatory. The moment a puffed round leaves the pan, someone is reaching for it, tearing off a corner, and finding a new topping to try. Whether you live near the historic district with its tree-lined streets or closer to 95th Street where weeknights can be a blur of after-school activities, fresh pita promises a quick path to a nourishing meal. It’s made from pantry basics and becomes an edible bridge between salads, proteins, and sauces. The more you bake it, the more you realize that the process is as comforting as the result.
Ingredients That Work in Our Midwestern Climate
You do not need esoteric flour or fancy yeast. All-purpose flour from our neighborhood grocer works beautifully, though many Naperville bakers mix in a portion of bread flour for a chewier crumb. I often reach for unbleached all-purpose as the base because it absorbs water predictably and browns evenly in a hot pan. If you prefer a more rustic bite, fold in a spoonful or two of whole wheat; just remember whole wheat drinks more water, so plan to hydrate a little extra. For yeast, active dry or instant are both fine. The water should feel like a warm bath—somewhere around the temperature you’d use to rinse dishes without scalding your hands. A drizzle of olive oil softens the dough and keeps leftovers pliable. And salt deserves a mention: In a simple bread like this, a measured pinch isn’t merely seasoning; it’s structure, flavor, and restraint rolled together.
Mixing by Hand: A Naperville Evening Routine
When the sun tilts west over Centennial Beach and dinner hour nears, I often stir the dough together by hand. Start by whisking yeast into warm water with a whisper of honey to wake it up, then add flour in stages until the spoon stands up. Once the dough begins to form clumps, tip it onto a lightly floured counter and knead gently. You’re not beating it into submission; you’re coaxing it toward elasticity. I like to stop kneading just before the dough looks camera-ready. A little ruggedness at this stage can translate into a more interesting pocket later. Place it in a lightly oiled bowl, cover, and let it rest. In summer, that might mean checking it after 45 minutes. In winter, give it an hour or more. The goal is a dough that has risen by half, feels airy when pressed, and stretches without tearing.
Hydration, Humidity, and the Midwestern Mindset
Humidity is our invisible collaborator. On muggy days, you’ll find that the dough loosens far faster than expected. You might think of hydration not as a number but as a sliding scale. If your dough sticks like a lost puppy to your fingers, dust in a touch of flour during kneading. If it’s tight and dry, add a teaspoon of water and knead again. Keep a mental picture of the dough you want: satin-smooth on the surface, buoyant underneath, and relaxed enough to roll without snapping back. This flexibility is what encourages the dramatic steam puff that creates a pocket.
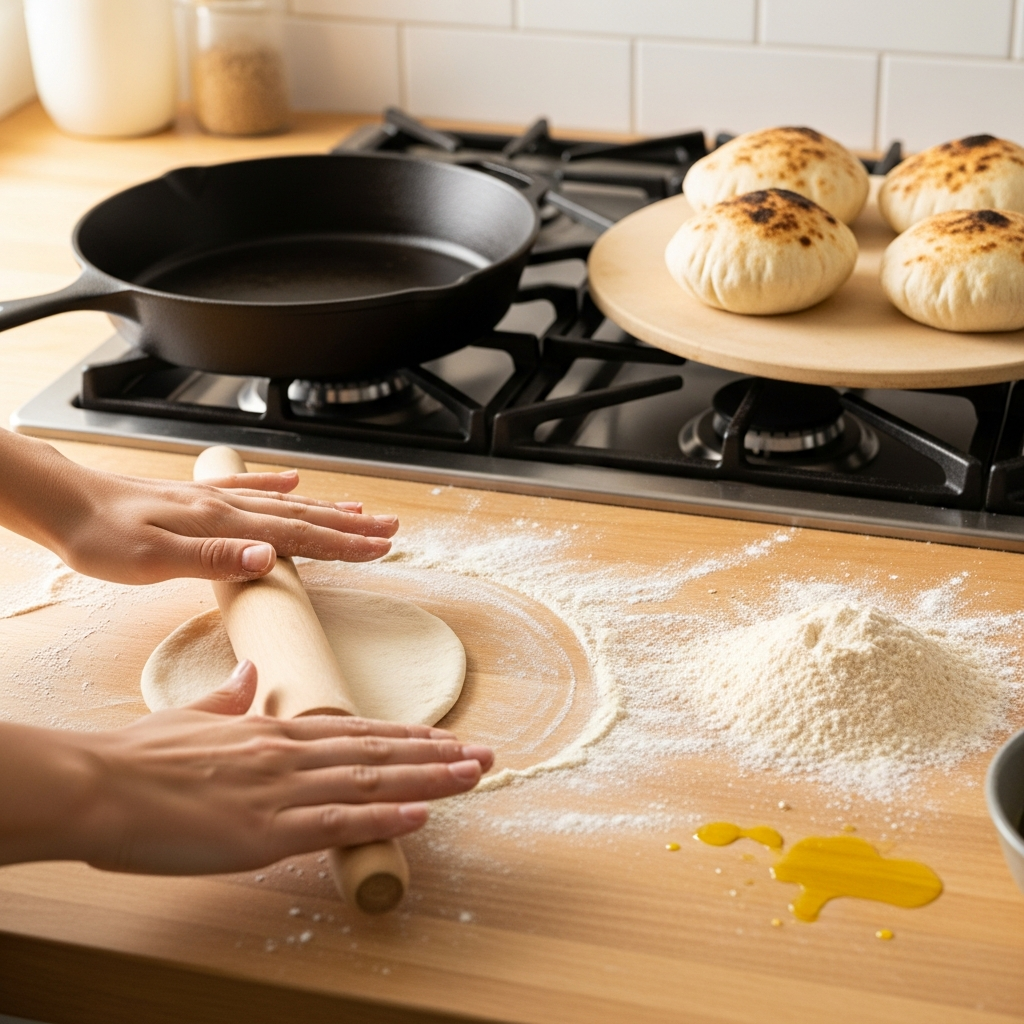
Shaping Rounds That Rise to the Occasion
After the first rise, divide the dough into equal pieces and round them gently beneath your palms. Rather than driving them into perfect balls, aim to build just enough surface tension to guide their shape. Rest them for a few minutes under a towel, letting the gluten drop its shoulders. When you roll, dust the counter lightly but don’t overdo it. Excess flour scorches in a skillet. Roll to a steady thickness, a touch under a quarter-inch, and resist the temptation to make them paper thin. Thin pitas may brown quickly but struggle to form a robust pocket. Keep an eye on evenness; lopsided rounds puff erratically.
Choosing Heat: Stone, Steel, or Skillet
I have baked pita on a preheated steel in a home oven, on a baking stone, and in a cast-iron skillet on the stovetop. Each works. If you use the oven, preheat longer than you think you need to—at least 30 minutes at a high temperature—so the cooking surface stores real heat. Slide the rolled dough onto the stone or steel and watch closely. With luck and practice, you’ll see a gentle swell turn into a proud balloon within a minute or two. If you prefer the stovetop, lay a round on a fully heated cast-iron skillet and don’t nudge it right away. When you see large bubbles, flip and press gently with a spatula to encourage the puff. Work with the heat you have, and give yourself a couple of trial pitas to learn the dance.
During this stage I often imagine the fillings I might pair with the finished bread, from grilled vegetables to garlicky sauces. Sometimes I look for flavor ideas the same way I stroll downtown for weekend inspiration, glancing at a Mediterranean menu to spark new combinations. The beauty of fresh pita is that it performs just as well as a wrap as it does torn into wedges for dipping.
Timing and Touch: The Secret to the Pocket
The pocket is born from steam trapped between two layers of dough that briefly separate in the heat. That separation depends on proper hydration, even thickness, and swift high heat. If your dough is too wet, it may bubble without lifting. Too dry, and it can brown without blistering. When the balance is right, heat rushes in, steam expands, and the pita puffs like a proud sail along the DuPage on a windy afternoon. It’s a moment that never gets old, a small triumph that makes the kitchen feel electric.
Troubleshooting Like a Local Baker
If your first round refuses to puff, do not lose heart. Naperville bakers trade tips the way neighbors swap garden cuttings. Try covering the dough balls a little longer so they relax more before rolling. Check that your skillet or oven surface is truly hot. If rolling let the dough sit for a minute between passes so it doesn’t resist. And keep an eye on thickness; a little too thin or too thick both make puffing harder. I also find that lightly misting the top of the rolled dough just before it hits the pan can help, especially in a dry winter kitchen.
Flavor Additions from Our Local Pantry
Though classic pita is wonderfully simple, Naperville pantries are stocked with herbs and cheeses that invite experimentation. A whisper of dried oregano, a pinch of za’atar, or a brush of olive oil can turn a weeknight pita into a signature bread. For a delicate tang, work a spoonful of plain yogurt into the dough and reduce the water slightly. If you grow herbs in a backyard box near a sunny patio, snip a few leaves of basil or thyme and fold them into the dough after the first rest. The flavors should never bully the bread; they should ride along comfortably, like a friend in the passenger seat along Washington Street.
Serving Fresh: From Riverwalk Picnics to Game Night
Freshly baked pita is irresistible within minutes of cooking. If we’re headed to a summer concert at Rotary Hill, I’ll wrap warm pitas in a clean towel and pack them still-steaming into a cloth bag. At home, I lay them on a rack while I finish the batch so the bottoms don’t sweat. Slice to make pockets for grilled chicken, falafel, or crunchy cucumbers, or leave whole and use as flatbreads. When paired with bright salads or roasted spreads, pita becomes the backbone of an easy meal that feels healthy without being fussy.
Make-Ahead, Storage, and Reheating
Real life in Naperville means balancing work, school, and community commitments, so a make-ahead plan matters. The dough can rest in the refrigerator overnight for a slower rise that develops flavor. Store cooked pitas in a zip-top bag once completely cool to prevent condensation. To revive them, tap a few drops of water onto the surface and warm in a hot skillet for 30 seconds per side, or wrap in a barely damp towel and microwave for a few heartbeats. They’ll soften and wake up close to fresh, which makes leftovers feel like a purposeful choice rather than a compromise.
Texture, Color, and Doneness Cues
We eat with our eyes as much as with our hands, and pita offers perfect visual cues. Watch for a creamy tan base color with sun-kissed brown spots. The edges should look set, not raw, and the whole round should feel soft yet resilient when pressed. If your pita goes hard as it cools, it probably cooked too long. Next round, pull it off sooner and tuck it under a towel. The towel trap is your friend—it captures a hint of steam that keeps the bread supple without turning it soggy.
From Local Markets to the Family Table
On Saturday mornings, the hum of the farmers market inspires swaps: a handful of fresh spinach for a spinach-feta pocket, a basket of cherry tomatoes for a quick oven roast, a jar of pickled peppers for sparkle. Back home, everyone assembles their own combination at the table, and the pitas move from platter to hands to plates in a rhythm that feels communal. If you have a backyard grill, consider tossing a rolled round onto a preheated pizza stone outside; the smoky hint is a subtle nod to wood-fired ovens without leaving the neighborhood.
Healthful and Satisfying
Homemade pita strikes a smart balance. You control the ingredient list and can keep the salt modest. If you’re watching portions, the individual rounds serve as a natural guide. Each one feels like a complete unit rather than an open-ended invitation to keep slicing. Combine with crunchy salads and well-seasoned proteins, and you have a meal that powers an afternoon at the library or a long walk along the Riverwalk.
Seasonal Twists for Naperville Weather
In summer, I like to add grated zucchini—squeezed dry—into the dough for moisture and a faint vegetal sweetness. In autumn, when the air smells like leaves, a pinch of warm spices pairs beautifully with roasted squash tucked into a pita pocket. Winter invites hearty stews and braised meats folded into warm rounds, the bread soaking up juices like a good friend taking in a story. Spring calls for herbs, lemony spreads, and crisp radishes that snap with every bite. Through it all, the method holds: patient proofing, even rolling, steady heat, and that small, joyful puff.
Halfway through a batch, while one pita puffs and another rests, I often think ahead to sauces and sides. A tahini drizzle or garlicky yogurt comes together in minutes, and a chopped salad can be tossed between flips. When I want to broaden the range of inspirations, I sometimes scan a local menu for pairing ideas—things like bright pickles, charred peppers, or citrusy herbs that bring the pita to life without overshadowing it.
Practice Notes for Consistent Results
The more you bake, the more you’ll notice how small changes yield big results. Dough that rests an extra ten minutes is easier to roll and more likely to puff. Rounds that go onto the heat within a few minutes of rolling sometimes balloon higher than those that sit too long and dry out. If you’re baking in the oven, work quickly when you open the door; a blast of cold air can stall a puff. Keep your tools simple: a rolling pin, a bench scraper, a clean towel, and a skillet or stone. Mastery here is not about equipment; it is about rhythm and attention.
Frequently Asked Questions About Homemade Pita in Naperville
How can I adjust hydration for Naperville’s changing seasons?
In summer, start on the lower end of water and add more only if the dough feels stiff; the ambient humidity will keep it supple. In winter, begin slightly higher and be ready to add a teaspoon or two if the dough resists rolling or tears easily. The right feel is smooth and elastic with a soft bounce under your fingertips.
Why didn’t my pita puff even though my oven was hot?
Puff failures usually trace back to uneven thickness or tight gluten. Let dough balls rest before rolling so the gluten relaxes. Roll evenly—not too thin—and make sure your baking surface is preheated thoroughly. A dry surface can also hinder puff; a quick spritz of water on the dough’s top before baking can help in winter.
Can I make the dough the night before a busy school day?
Yes. Mix and knead, then refrigerate in a covered bowl. The next day, let it come to room temperature for 45–60 minutes, divide, rest, and roll. The slow rise adds flavor and fits neatly into a Naperville weekday routine.
What flour blend gives me the best pocket and chew?
All-purpose flour alone works well, but blending two parts all-purpose with one part bread flour gives extra strength for dramatic pockets. If adding whole wheat, start small—about a quarter of the total flour—and increase once you’ve learned how the dough behaves.
Is cast iron better than a baking stone?
Both deliver. Cast iron shines for stovetop control and quick flips, while a stone or steel excels at strong, even bottom heat in the oven. If your oven doesn’t get blazing hot, the stovetop can be more reliable. If you have a powerful oven, the stone approach lets you bake multiple pitas in quick succession.
How do I keep leftover pita soft for lunches?
Cool completely, then store in an airtight bag. Reheat with a few drops of water in a hot skillet or wrapped in a damp towel for a brief microwave burst. The goal is to add a whisper of steam without overcooking.
Can I flavor the dough without weakening the pocket?
Yes—use dry spices and fine herbs sparingly, and avoid adding too much oil directly to the dough. Brush flavored oil on the cooked pitas instead. If using yogurt, reduce water slightly and keep total hydration in balance.
Ready to bake, share, and enjoy?
If tonight feels like the right night to turn flour and water into something warm, gather your ingredients and preheat your pan. Invite the family to the counter, roll together, and watch the first round puff like a small victory. And when you’re ready to pair your bread with bold, savory sides or simply want ideas for what to serve alongside, explore a local Mediterranean menu, then bring those flavors to your own table. Homemade pita is a Naperville tradition waiting to happen, one round at a time.