There is something liberating about making pita bread without yeast, especially on a busy Naperville evening when dinner needs to come together quickly. Instead of scheduling around a rise, you mix, rest briefly, and cook—simple steps that deliver warm rounds ready for scooping and wrapping. No-yeast pita trades the dramatic balloon pocket for a gentle lift created by baking powder, baking soda, or a lively combination that reacts with yogurt or buttermilk. The result is soft and flexible, exactly what you want when you’ve got grilled vegetables, herby spreads, or quick skillet proteins on the table. And when I want ideas for zesty, satisfying pairings, I sometimes glance at a Mediterranean menu to jumpstart my imagination.
In Naperville, our cooking often follows the season. On summer nights when the air is thick and the backyard is buzzing, I keep the dough light and the skillet hot, moving quickly so we can get back to the patio. In winter, when a walk along the Riverwalk calls for gloves and a hat, no-yeast pita becomes a warm, practical base for hearty stews and roasted vegetables. The method changes slightly with the weather, but the promise is the same: from simple pantry ingredients, you get a tender round that bends without cracking and tastes like comfort.
How No-Yeast Pita Rises
Instead of relying on living yeast to ferment and inflate the dough, no-yeast pita depends on fast-acting leaveners. Baking powder produces carbon dioxide as it warms and interacts with moisture; baking soda does the same in the presence of acidity, which is why yogurt or buttermilk pair so well here. The tiny bubbles created during cooking tenderize the crumb and lend a subtle lift. You won’t get a towering pocket, but you will get a bread that folds, dips, and wraps beautifully—ideal for a weekday dinner when time is short.
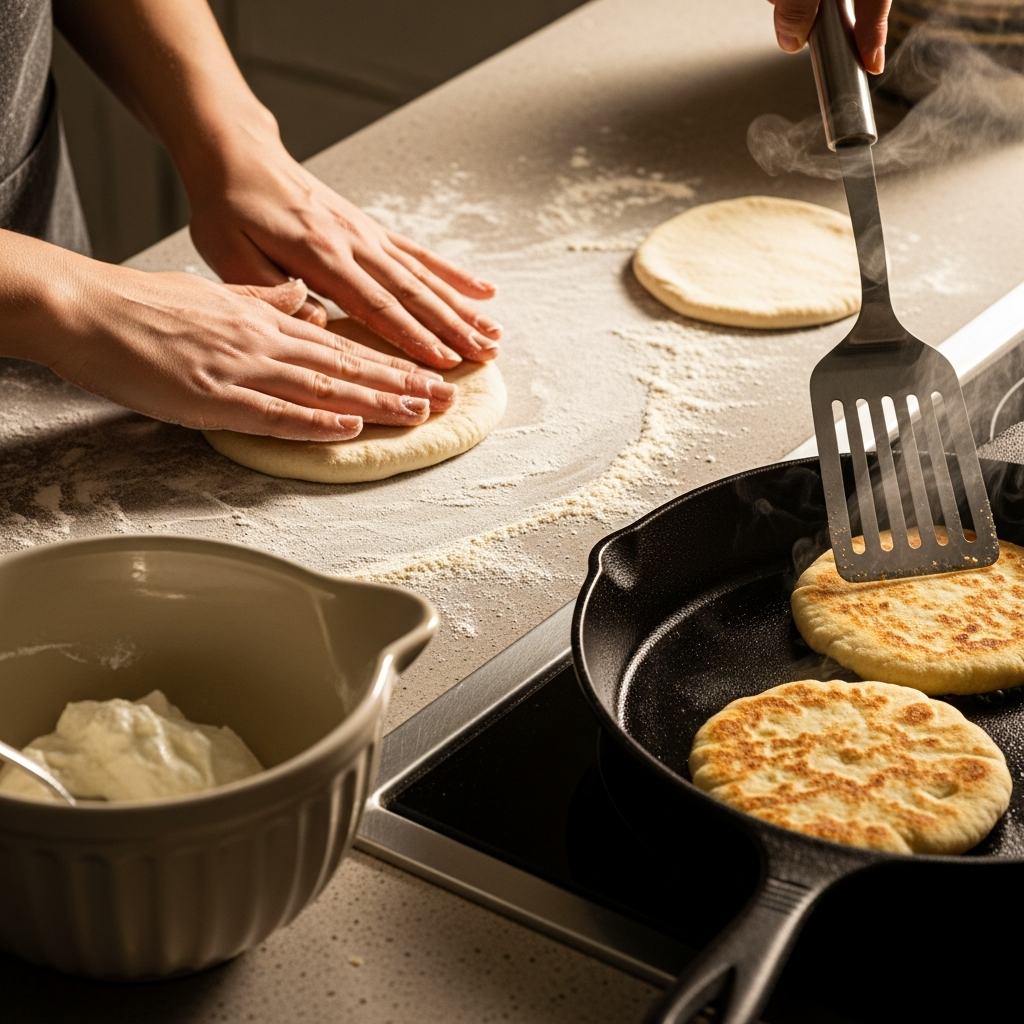
Mixing the Dough: A Smooth, Quick Routine
Start by whisking dry ingredients—flour, salt, baking powder (and soda if using yogurt)—then add wet ingredients. Plain yogurt or buttermilk provides moisture, a gentle tang, and a reliable reaction with the soda for extra tenderness. Knead briefly just until the dough is cohesive and smooth; over-kneading can make the rounds tough. Let it rest for ten to fifteen minutes under a towel. This rest is essential: it relaxes gluten and allows the leaveners to distribute, giving you an even, pleasant cook on the stovetop or stone.
Managing Moisture in Our Midwest Climate
Humidity affects no-yeast dough just as it does yeasted versions. On muggy days, use a touch less liquid; on dry winter days, add a teaspoon or two more until the dough feels soft and elastic but not sticky. If you find the dough clinging to your hands, dust lightly with flour but avoid overdoing it, as too much flour can dull the surface and reduce tenderness. You should be able to pinch a bit of dough, stretch it a little, and see a smooth interior rather than a crumbly tear.
Shaping and Thickness for the Best Fold
Divide the dough into equal pieces, then round them under your palms and let them rest briefly. Roll to a steady thickness—about a quarter inch—to balance browning and flexibility. Thicker rounds stay plush but may take a touch longer to cook; thinner ones brown quicker but can dry at the edges. Aim for evenness more than perfection. If the dough resists rolling, pause and let it relax for a minute or two under a towel.
Cooking: Skillet Speed or Oven Steadiness
A cast-iron skillet delivers quick gratification. Preheat on medium-high until a drop of water skitters across the surface. Lay on a round and watch for bubbles to appear; flip and press gently with a spatula to encourage even contact with the pan. For the oven, preheat a stone or steel thoroughly to build a reservoir of heat. Slide on the rounds and cook until tan with freckles, then transfer to a towel-lined plate. Cover to trap a hint of steam and preserve softness while you finish the batch.
Flavor Tweaks That Shine Without Yeast
No-yeast pita is an open invitation to subtle flavors. A spoonful of olive oil in the dough adds suppleness; a pinch of dried oregano or thyme echoes Greek inspiration. If you enjoy warmth, a dusting of smoked paprika or cumin brushed on with oil after cooking perfumes the bread and adds gentle color. Garlic oil is another favorite—rub a split clove lightly over the warm surface and brush with olive oil for a fragrant finish.
Serving Ideas for Naperville Tables
Bring these to the table with bowls of chopped salad, quick-sautéed peppers and onions, or a lemony yogurt sauce. For a kid-friendly option, layer with sliced cucumbers and roasted chicken. Vegetarians can build a satisfying wrap with roasted cauliflower, chickpeas, and a drizzle of tahini. If you’re hosting friends before a night out downtown, tear the rounds into wedges for dipping. They hold up nicely to hummus, eggplant spreads, and bright, herby sauces.
Make-Ahead and Reheat for Busy Schedules
While you don’t need to plan hours ahead, you can mix the dough earlier in the day and refrigerate it, covered, to slow the leaveners. Bring it to room temperature before rolling and cooking. Cooked pitas keep well for a day or two in an airtight bag. Reheat quickly in a hot skillet with a few droplets of water for steam, or wrap in a damp towel for a brief microwave burst. The key is speed—reheat just until soft and warm, not long enough to dry them out.
Troubleshooting Texture and Browning
If your pitas come out pale, increase heat slightly or cook a bit longer, but avoid scorching. If they taste bitter, you may have used too much baking soda without enough acid; balance the formula by relying more on baking powder or by ensuring there’s enough yogurt or buttermilk in the mix. If the bread feels tough, shorten kneading and cooking time, and verify that you gave the dough a short rest before rolling.
Bringing the Bread Into Your Routine
Once you learn how no-yeast pita behaves, it becomes a weekday staple. The method is forgiving and the results are consistent. Because the rounds cook quickly, you can prep fillings while you roll, moving efficiently through dinner prep without cluttering the counter with extra bowls or timers. And the aroma in the kitchen—warm, slightly tangy, edged with olive oil—is a comfort on its own.
Local Touches That Make It Yours
Naperville cooks have a knack for making recipes feel personal. Add chopped fresh herbs from your patio planter, or finish with a squeeze of lemon after cooking for brightness. If you’re grilling outside in summer, set a cast-iron griddle on the grill and cook the pitas next to skewers of vegetables. That gentle smoke whispers through the bread and sets the scene for an unhurried backyard meal.
Nutrition Notes and Smart Pairings
No-yeast pita can be made with all-purpose flour, a blend with whole wheat, or even a portion of alternative flours. Keep in mind that higher whole wheat content usually needs more moisture to stay tender. Build plates with color and texture: leafy greens, crunchy cucumbers, tomatoes, roasted peppers, or seasoned beans. A little olive oil, a squeeze of citrus, and a pinch of salt finish the picture with balance and brightness.
As you settle into your groove, don’t be afraid to borrow ideas. I’ll sometimes take cues from a Mediterranean menu—a certain pickle, a garlicky sauce, or a spice blend—and let that guide the evening’s spread. The bread is your canvas; the toppings are your palette.
Frequently Asked Questions About No-Yeast Pita
Will no-yeast pita ever develop a real pocket?
It may form bubbles and partial separations inside, but the classic balloon pocket relies on steam between gluten layers that yeast-based dough structures especially well. No-yeast versions are typically pocket-less or lightly layered, perfect for wraps and wedges.
What’s the best leavener blend?
A dependable formula uses baking powder alone or a mix of baking powder and baking soda when there’s acidity from yogurt or buttermilk. Too much soda without acid can taste soapy, so keep the balance modest and purposeful.
How do I keep them soft after cooking?
Stack finished pitas and trap a little steam under a clean towel as you work. Reheat gently with a touch of moisture. Avoid overcooking—the most common cause of stiffness.
Can I make them gluten-free?
You can experiment with gluten-free blends designed for flatbreads, often with binders like xanthan gum or psyllium husk. Expect a different texture, but with practice, you can achieve a pliable, tasty result.
What thickness should I roll to?
Around a quarter inch strikes a good balance for color and flexibility. Thinner rounds cook faster but can dry at the edges; thicker ones stay plush but need an extra moment on the heat.
Can I freeze the dough or the cooked pitas?
Cooked pitas freeze best. Cool fully, wrap well, and reheat in a hot skillet with a few drops of water. The dough can rest in the fridge for a day, but freezing the raw dough can disrupt the quick-acting leaveners’ performance.
Ready for warm, no-wait pita tonight?
Clear a bit of counter space, mix your dough, and heat a skillet until it hums. Roll, cook, and bring the first hot round to the table with your favorite spreads and crunchy vegetables. For fresh pairing ideas that keep dinner lively, browse a Mediterranean menu, then let your Naperville pantry do the rest. A quick, satisfying meal is just a few minutes away.